Documentation Index

Fetch the complete documentation index at: https://nvd-54.mintlify.app/llms.txt

Use this file to discover all available pages before exploring further.

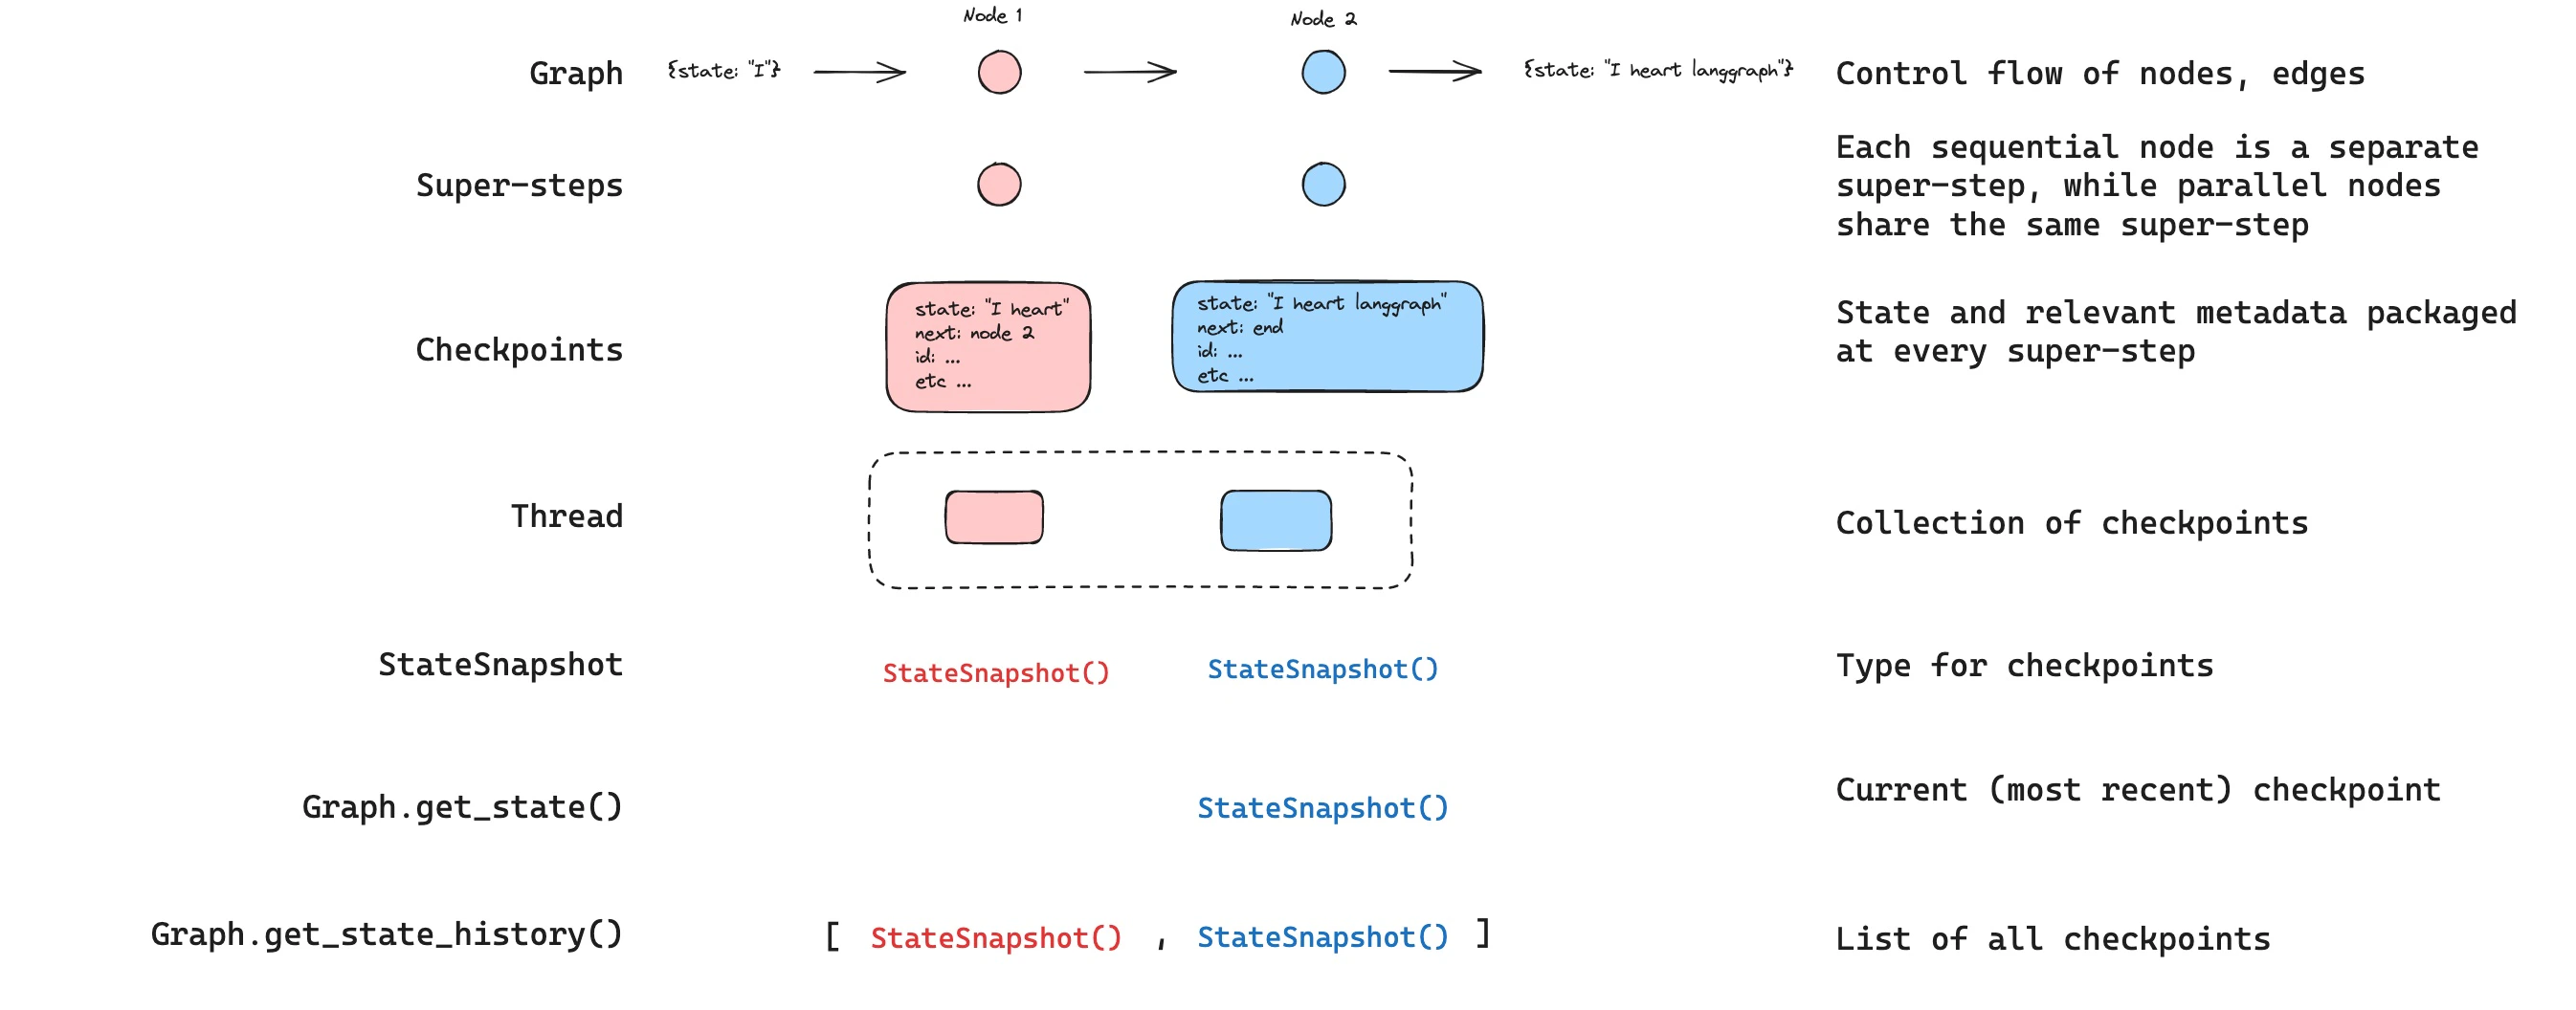
LangGraph 内置了持久化层,将图状态保存为检查点。当你使用检查点器编译图时,图状态的快照会在执行的每一步保存,并组织成线程。这实现了人机协作工作流、对话记忆、时间旅行调试和容错执行。 Checkpoints
智能体服务器自动处理检查点 使用智能体服务器时,你不需要手动实现或配置检查点器。服务器在后台为你处理所有持久化基础设施。
Trace checkpointed state and debug how your agent resumes across sessions with LangSmith. Follow the tracing quickstart to get set up.

为什么使用持久化

以下功能需要持久化:
  • 人机协作:检查点器通过允许人类检查、中断和批准图步骤来促进人机协作工作流。这些工作流需要检查点器,因为人员必须能够在任何时间点查看图的状态,并且图必须能够在人员对状态进行任何更新后恢复执行。有关示例,请参阅中断
  • 记忆:检查点器允许在交互之间保持”记忆”。在重复的人类交互(如对话)的情况下,任何后续消息都可以发送到该线程,线程将保留其对先前消息的记忆。有关如何使用检查点器添加和管理对话记忆的信息,请参阅添加记忆
  • 时间旅行:检查点器允许”时间旅行”,允许用户重播先前的图执行以审查和/或调试特定的图步骤。此外,检查点器使得可以在任意检查点分叉图状态以探索替代轨迹。
  • 容错:检查点提供容错和错误恢复:如果一个或多个节点在给定的超级步骤中失败,你可以从最后一个成功步骤重新启动图。
  • Pending writes: When a graph node fails mid-execution at a given super-step, LangGraph stores pending checkpoint writes from any other nodes that completed successfully at that super-step. When you resume graph execution from that super-step you don’t re-run the successful nodes.

核心概念

线程

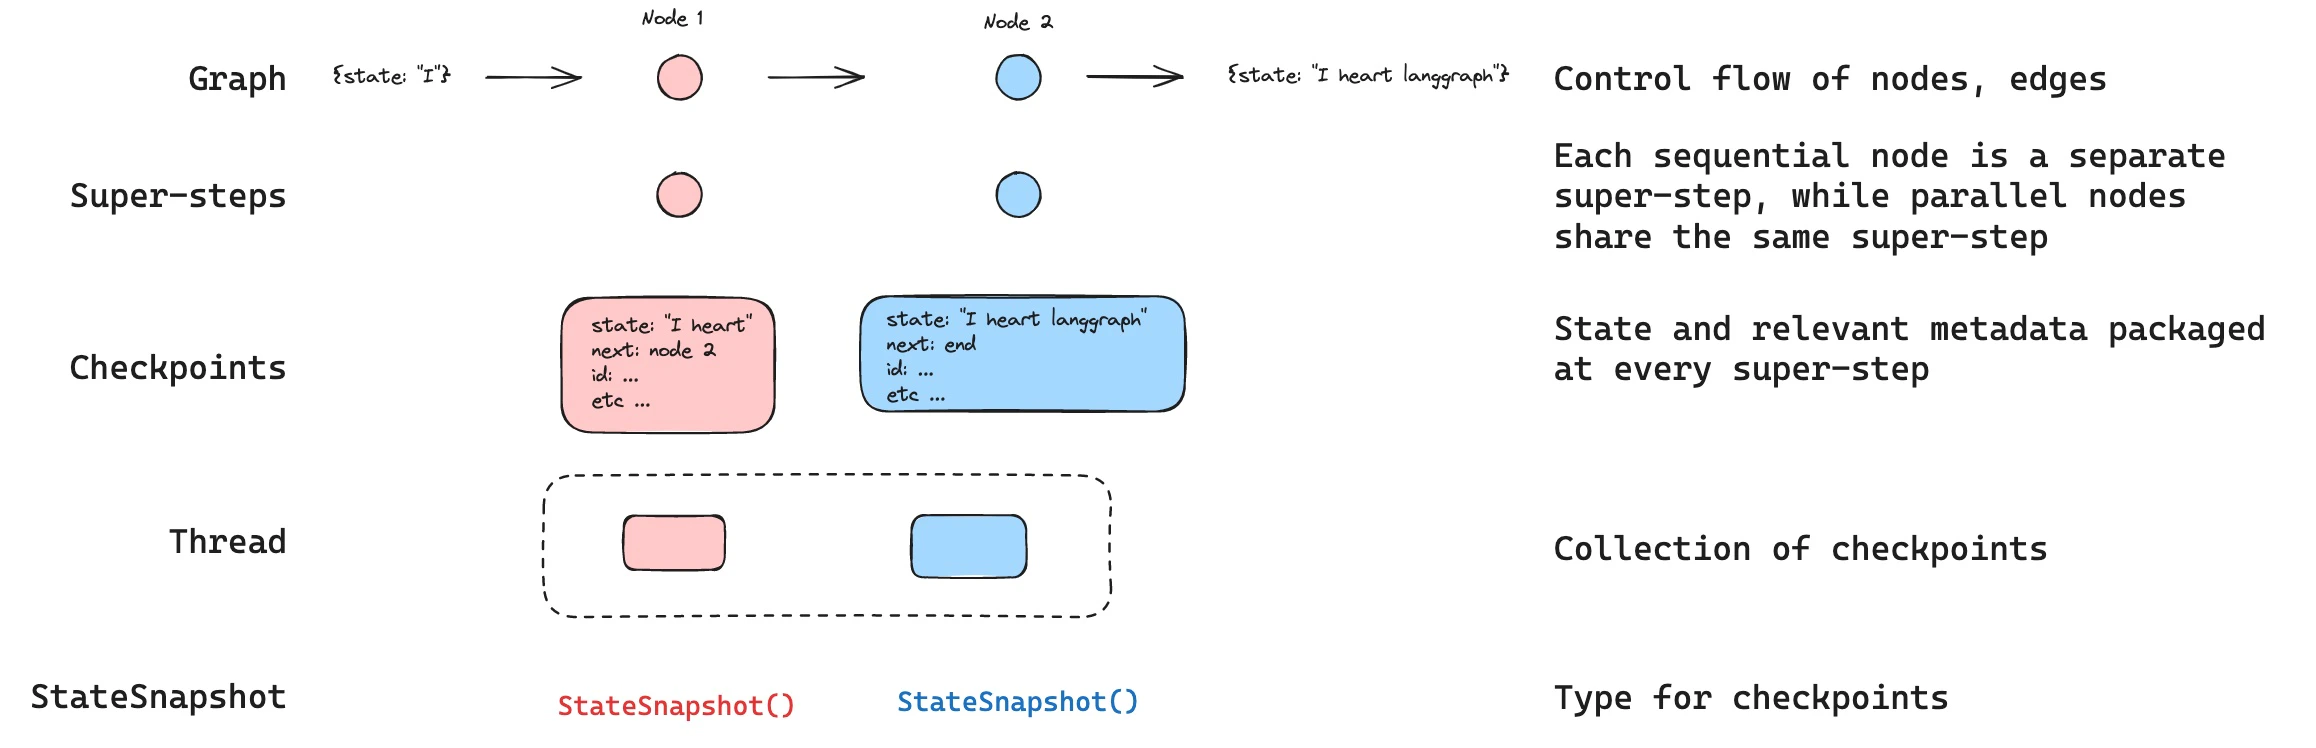
线程是分配给检查点器保存的每个检查点的唯一 ID 或线程标识符。它包含一系列运行的累积状态。当运行被执行时,助手底层图的状态将被持久化到线程中。 When invoking a graph with a checkpointer, you must specify a thread_id as part of the configurable portion of the config:
{
  configurable: {
    thread_id: "1";
  }
}
A thread’s current and historical state can be retrieved. To persist state, a thread must be created prior to executing a run. The LangSmith API provides several endpoints for creating and managing threads and thread state. See the API reference for more details. The checkpointer uses thread_id as the primary key for storing and retrieving checkpoints. Without it, the checkpointer cannot save state or resume execution after an interrupt, since the checkpointer uses thread_id to load the saved state.

检查点

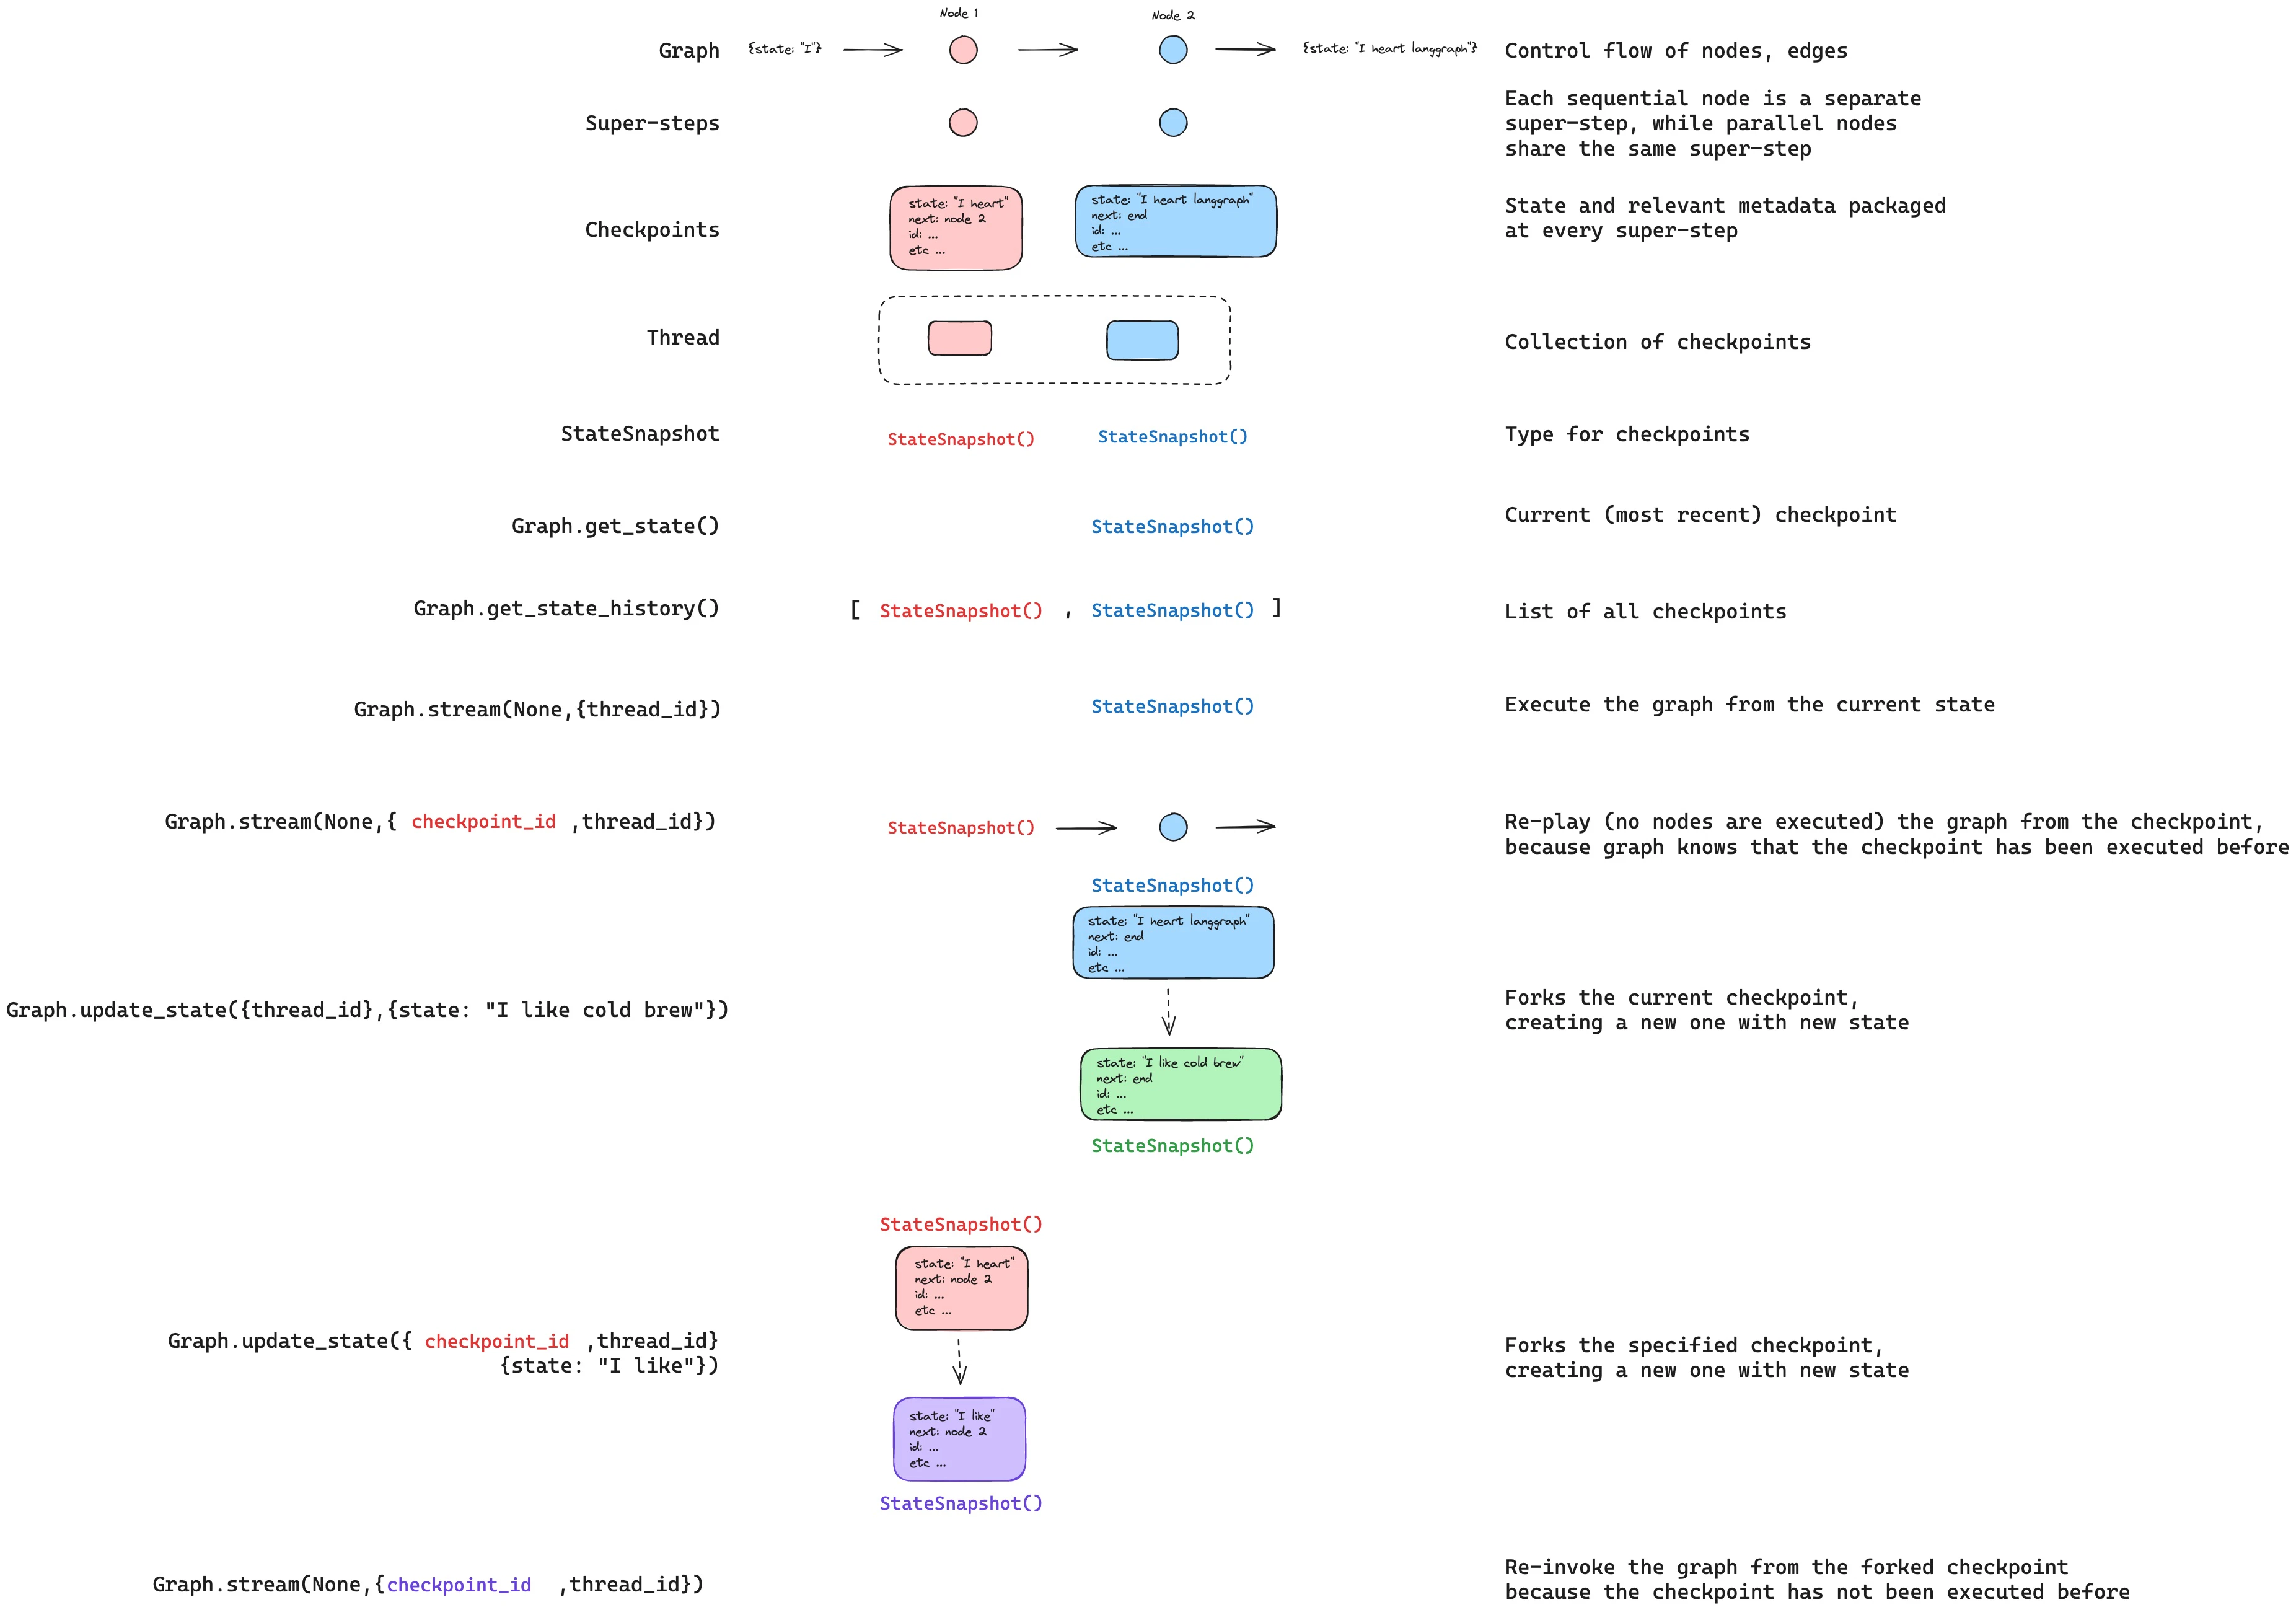
线程在特定时间点的状态称为检查点。检查点是在每个超级步骤保存的图状态快照,由 StateSnapshot 对象表示(完整字段参考请参阅 StateSnapshot 字段)。

Super-steps

LangGraph creates a checkpoint at each super-step boundary. A super-step is a single “tick” of the graph where all nodes scheduled for that step execute (potentially in parallel). For a sequential graph like START -> A -> B -> END, there are separate super-steps for the input, node A, and node B — producing a checkpoint after each one. Understanding super-step boundaries is important for time travel, because you can only resume execution from a checkpoint (i.e., a super-step boundary). In addition to super-step checkpoints, LangGraph also persists writes at the node (task) level. As each node within a super-step finishes, its outputs are written to the checkpointer’s checkpoint_writes table as task entries linked to the in-progress checkpoint. These per-task writes are what enable pending writes recovery: if another node in the same super-step fails, the successful nodes’ writes are already durable and don’t need to be re-run on resume. The full state snapshot is then committed once the super-step completes. LangGraph also persists writes from individual node executions within a super-step. These writes are stored as tasks and used for fault tolerance: if another node in the same super-step fails, successful node writes do not need to be recomputed when you resume. These task writes are not full StateSnapshot checkpoints, so time travel resumes from full checkpoints at super-step boundaries. Checkpoints are persisted and can be used to restore the state of a thread at a later time. Let’s see what checkpoints are saved when a simple graph is invoked as follows:
import { StateGraph, StateSchema, ReducedValue, START, END, MemorySaver } from "@langchain/langgraph";
import { z } from "zod/v4";

const State = new StateSchema({
  foo: z.string(),
  bar: new ReducedValue(
    z.array(z.string()).default(() => []),
    {
      inputSchema: z.array(z.string()),
      reducer: (x, y) => x.concat(y),
    }
  ),
});

const workflow = new StateGraph(State)
  .addNode("nodeA", (state) => {
    return { foo: "a", bar: ["a"] };
  })
  .addNode("nodeB", (state) => {
    return { foo: "b", bar: ["b"] };
  })
  .addEdge(START, "nodeA")
  .addEdge("nodeA", "nodeB")
  .addEdge("nodeB", END);

const checkpointer = new MemorySaver();
const graph = workflow.compile({ checkpointer });

const config = { configurable: { thread_id: "1" } };
await graph.invoke({ foo: "", bar: [] }, config);
After we run the graph, we expect to see exactly 4 checkpoints:
  • Empty checkpoint with START as the next node to be executed
  • Checkpoint with the user input {'foo': '', 'bar': []} and nodeA as the next node to be executed
  • Checkpoint with the outputs of nodeA {'foo': 'a', 'bar': ['a']} and nodeB as the next node to be executed
  • Checkpoint with the outputs of nodeB {'foo': 'b', 'bar': ['a', 'b']} and no next nodes to be executed
Note that the bar channel values contain outputs from both nodes as we have a reducer for the bar channel.

Checkpoint namespace

Each checkpoint has a checkpoint_ns (checkpoint namespace) field that identifies which graph or subgraph it belongs to:
  • "" (empty string): The checkpoint belongs to the parent (root) graph.
  • "node_name:uuid": The checkpoint belongs to a subgraph invoked as the given node. For nested subgraphs, namespaces are joined with | separators (e.g., "outer_node:uuid|inner_node:uuid").
You can access the checkpoint namespace from within a node via the config:
import { RunnableConfig } from "@langchain/core/runnables";

function myNode(state: typeof State.Type, config: RunnableConfig) {
  const checkpointNs = config.configurable?.checkpoint_ns;
  // "" for the parent graph, "node_name:uuid" for a subgraph
}
See Subgraphs for more details on working with subgraph state and checkpoints.

获取和更新状态

获取状态

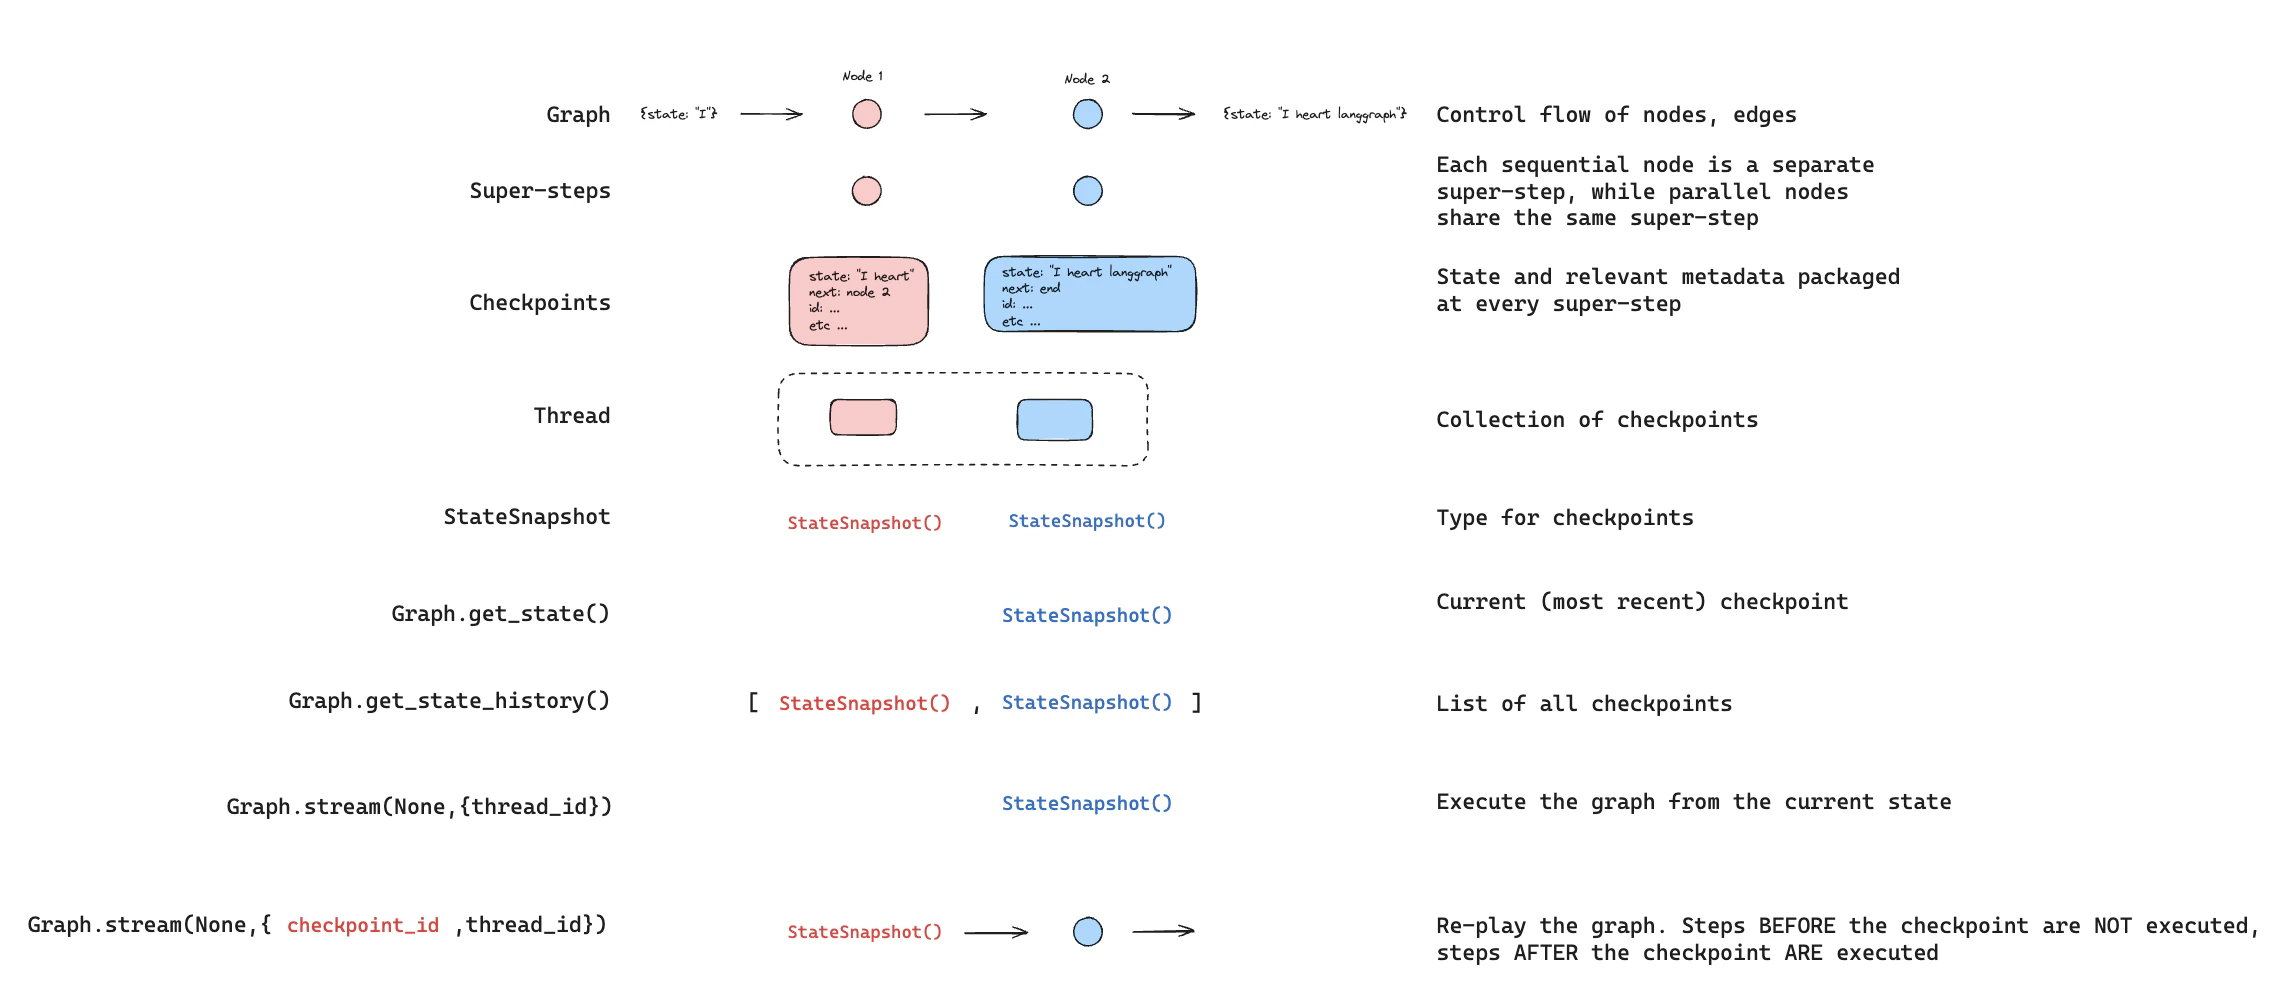
When interacting with the saved graph state, you must specify a thread identifier. You can view the latest state of the graph by calling graph.getState(config). This will return a StateSnapshot object that corresponds to the latest checkpoint associated with the thread ID provided in the config or a checkpoint associated with a checkpoint ID for the thread, if provided.
// get the latest state snapshot
const config = { configurable: { thread_id: "1" } };
await graph.getState(config);

// get a state snapshot for a specific checkpoint_id
const config = {
  configurable: {
    thread_id: "1",
    checkpoint_id: "1ef663ba-28fe-6528-8002-5a559208592c",
  },
};
await graph.getState(config);
In our example, the output of getState will look like this:
StateSnapshot {
  values: { foo: 'b', bar: ['a', 'b'] },
  next: [],
  config: {
    configurable: {
      thread_id: '1',
      checkpoint_ns: '',
      checkpoint_id: '1ef663ba-28fe-6528-8002-5a559208592c'
    }
  },
  metadata: {
    source: 'loop',
    writes: { nodeB: { foo: 'b', bar: ['b'] } },
    step: 2
  },
  createdAt: '2024-08-29T19:19:38.821749+00:00',
  parentConfig: {
    configurable: {
      thread_id: '1',
      checkpoint_ns: '',
      checkpoint_id: '1ef663ba-28f9-6ec4-8001-31981c2c39f8'
    }
  },
  tasks: []
}

StateSnapshot fields

FieldTypeDescription
valuesobjectState channel values at this checkpoint.
nextstring[]Node names to execute next. Empty [] means the graph is complete.
configobjectContains thread_id, checkpoint_ns, and checkpoint_id.
metadataobjectExecution metadata. Contains source ("input", "loop", or "update"), writes (node outputs), and step (super-step counter).
createdAtstringISO 8601 timestamp of when this checkpoint was created.
parentConfigobject | nullConfig of the previous checkpoint. null for the first checkpoint.
tasksPregelTask[]Tasks to execute at this step. Each task has id, name, error, interrupts, and optionally state (subgraph snapshot, when using subgraphs: true).

获取状态历史

You can get the full history of the graph execution for a given thread by calling graph.getStateHistory(config). This will return a list of StateSnapshot objects associated with the thread ID provided in the config. Importantly, the checkpoints will be ordered chronologically with the most recent checkpoint / StateSnapshot being the first in the list.
const config = { configurable: { thread_id: "1" } };
for await (const state of graph.getStateHistory(config)) {
  console.log(state);
}
In our example, the output of getStateHistory will look like this:
[
  StateSnapshot {
    values: { foo: 'b', bar: ['a', 'b'] },
    next: [],
    config: {
      configurable: {
        thread_id: '1',
        checkpoint_ns: '',
        checkpoint_id: '1ef663ba-28fe-6528-8002-5a559208592c'
      }
    },
    metadata: {
      source: 'loop',
      writes: { nodeB: { foo: 'b', bar: ['b'] } },
      step: 2
    },
    createdAt: '2024-08-29T19:19:38.821749+00:00',
    parentConfig: {
      configurable: {
        thread_id: '1',
        checkpoint_ns: '',
        checkpoint_id: '1ef663ba-28f9-6ec4-8001-31981c2c39f8'
      }
    },
    tasks: []
  },
  StateSnapshot {
    values: { foo: 'a', bar: ['a'] },
    next: ['nodeB'],
    config: {
      configurable: {
        thread_id: '1',
        checkpoint_ns: '',
        checkpoint_id: '1ef663ba-28f9-6ec4-8001-31981c2c39f8'
      }
    },
    metadata: {
      source: 'loop',
      writes: { nodeA: { foo: 'a', bar: ['a'] } },
      step: 1
    },
    createdAt: '2024-08-29T19:19:38.819946+00:00',
    parentConfig: {
      configurable: {
        thread_id: '1',
        checkpoint_ns: '',
        checkpoint_id: '1ef663ba-28f4-6b4a-8000-ca575a13d36a'
      }
    },
    tasks: [
      PregelTask {
        id: '6fb7314f-f114-5413-a1f3-d37dfe98ff44',
        name: 'nodeB',
        error: null,
        interrupts: []
      }
    ]
  },
  StateSnapshot {
    values: { foo: '', bar: [] },
    next: ['node_a'],
    config: {
      configurable: {
        thread_id: '1',
        checkpoint_ns: '',
        checkpoint_id: '1ef663ba-28f4-6b4a-8000-ca575a13d36a'
      }
    },
    metadata: {
      source: 'loop',
      writes: null,
      step: 0
    },
    createdAt: '2024-08-29T19:19:38.817813+00:00',
    parentConfig: {
      configurable: {
        thread_id: '1',
        checkpoint_ns: '',
        checkpoint_id: '1ef663ba-28f0-6c66-bfff-6723431e8481'
      }
    },
    tasks: [
      PregelTask {
        id: 'f1b14528-5ee5-579c-949b-23ef9bfbed58',
        name: 'node_a',
        error: null,
        interrupts: []
      }
    ]
  },
  StateSnapshot {
    values: { bar: [] },
    next: ['__start__'],
    config: {
      configurable: {
        thread_id: '1',
        checkpoint_ns: '',
        checkpoint_id: '1ef663ba-28f0-6c66-bfff-6723431e8481'
      }
    },
    metadata: {
      source: 'input',
      writes: { foo: '' },
      step: -1
    },
    createdAt: '2024-08-29T19:19:38.816205+00:00',
    parentConfig: null,
    tasks: [
      PregelTask {
        id: '6d27aa2e-d72b-5504-a36f-8620e54a76dd',
        name: '__start__',
        error: null,
        interrupts: []
      }
    ]
  }
]
State

Find a specific checkpoint

You can filter the state history to find checkpoints matching specific criteria:
const history: StateSnapshot[] = [];
for await (const state of graph.getStateHistory(config)) {
  history.push(state);
}

// Find the checkpoint before a specific node executed
const beforeNodeB = history.find((s) => s.next.includes("nodeB"));

// Find a checkpoint by step number
const step2 = history.find((s) => s.metadata.step === 2);

// Find checkpoints created by updateState
const forks = history.filter((s) => s.metadata.source === "update");

// Find the checkpoint where an interrupt occurred
const interrupted = history.find(
  (s) => s.tasks.length > 0 && s.tasks.some((t) => t.interrupts.length > 0)
);

Replay

Replay re-executes steps from a prior checkpoint. Invoke the graph with a prior checkpoint_id to re-run nodes after that checkpoint. Nodes before the checkpoint are skipped (their results are already saved). Nodes after the checkpoint re-execute, including any LLM calls, API requests, or interrupts — which are always re-triggered during replay. See Time travel for full details and code examples on replaying past executions. Replay
更新状态

You can edit the graph state using graph.updateState(). This creates a new checkpoint with the updated values — it does not modify the original checkpoint. The update is treated the same as a node update: values are passed through reducer functions when defined, so channels with reducers accumulate values rather than overwrite them. You can optionally specify asNode to control which node the update is treated as coming from, which affects which node executes next. See Time travel: asNode for details. Update
记忆存储

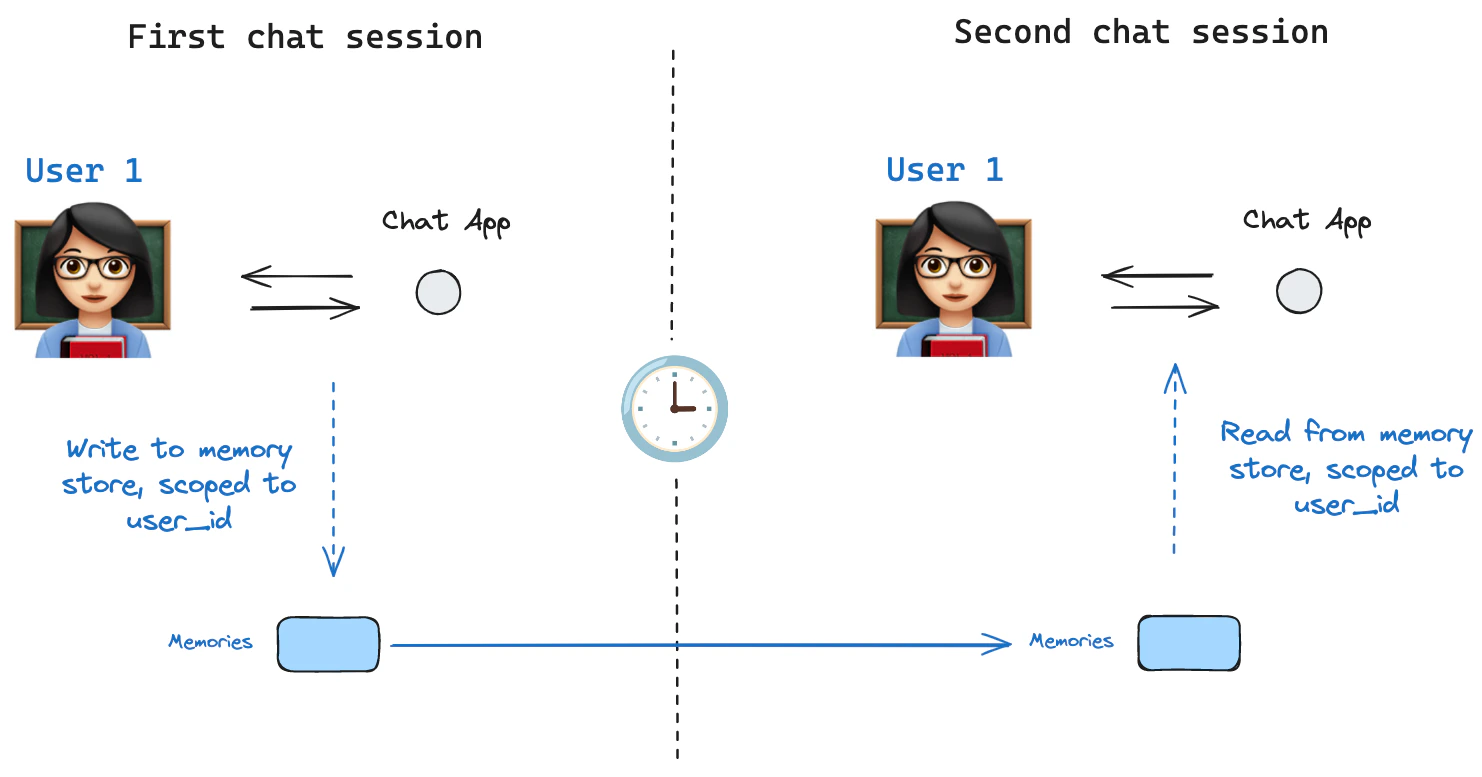
Model of shared state A state schema specifies a set of keys that are populated as a graph is executed. As discussed above, state can be written by a checkpointer to a thread at each graph step, enabling state persistence. What if we want to retain some information across threads? Consider the case of a chatbot where we want to retain specific information about the user across all chat conversations (e.g., threads) with that user! With checkpointers alone, we cannot share information across threads. This motivates the need for the Store interface. As an illustration, we can define an InMemoryStore to store information about a user across threads. We simply compile our graph with a checkpointer, as before, and pass the store.
LangGraph API handles stores automatically When using the LangGraph API, you don’t need to implement or configure stores manually. The API handles all storage infrastructure for you behind the scenes.
InMemoryStore is suitable for development and testing. For production, use a persistent store like PostgresStore, MongoDBStore, or RedisStore. All implementations extend BaseStore, which is the type annotation to use in node function signatures.

基本用法

First, let’s showcase this in isolation without using LangGraph.
import { MemoryStore } from "@langchain/langgraph";

const memoryStore = new MemoryStore();
Memories are namespaced by a tuple, which in this specific example will be (<user_id>, "memories"). The namespace can be any length and represent anything, does not have to be user specific.
const userId = "1";
const namespaceForMemory = [userId, "memories"];
We use the store.put method to save memories to our namespace in the store. When we do this, we specify the namespace, as defined above, and a key-value pair for the memory: the key is simply a unique identifier for the memory (memory_id) and the value (a dictionary) is the memory itself.
import { v4 as uuidv4 } from "uuid";

const memoryId = uuidv4();
const memory = { food_preference: "I like pizza" };
await memoryStore.put(namespaceForMemory, memoryId, memory);
We can read out memories in our namespace using the store.search method, which will return memories for a given user as a list, up to the limit argument (default 10). With InMemoryStore, items are returned in insertion order, so the most recent memory is last in the list; other backends may order differently (see Listing items in a namespace).
const memories = await memoryStore.search(namespaceForMemory);
memories[memories.length - 1];

// {
//   value: { food_preference: 'I like pizza' },
//   key: '07e0caf4-1631-47b7-b15f-65515d4c1843',
//   namespace: ['1', 'memories'],
//   createdAt: '2024-10-02T17:22:31.590602+00:00',
//   updatedAt: '2024-10-02T17:22:31.590605+00:00'
// }
The attributes it has are:
  • value: The value of this memory
  • key: A unique key for this memory in this namespace
  • namespace: A tuple of strings, the namespace of this memory type
    While the type is tuple, it may be serialized as a list when converted to JSON (for example, ['1', 'memories']).
  • createdAt: Timestamp for when this memory was created
  • updatedAt: Timestamp for when this memory was updated

Listing items in a namespace

Calling store.search with no query and no filter returns the items stored under the namespace prefix, up to limit. Use this to enumerate everything in a namespace when you don’t need semantic ranking.
// Return up to 100 items stored under ["alice", "memories"].
const items = await store.search(["alice", "memories"], { limit: 100 });
Three behaviors to keep in mind:
  • namespace_prefix matches by prefix, not exactly. ("alice",) also returns items under ("alice", "memories"), ("alice", "preferences"), and so on. To restrict to a single level, pass the full namespace or filter the returned items client-side on item.namespace.
  • Results past limit are silently truncated. There is no overflow signal—set limit above your expected maximum, or paginate with offset.
  • Default ordering depends on the store backend. PostgresStore and AsyncPostgresStore return results ordered by updated_at descending (most recently updated first). InMemoryStore returns results in insertion order (most recently inserted last). Do not rely on a specific order across implementations—sort client-side on item.updated_at if order matters.
To page through a large namespace:
const pageSize = 50;
let offset = 0;
while (true) {
  const page = await store.search(["alice", "memories"], { limit: pageSize, offset });
  if (page.length === 0) break;
  for (const item of page) {
    // ...
  }
  offset += pageSize;
}
To discover which namespaces exist (for example, to iterate over every user before listing their memories), use store.listNamespaces:
// All namespaces that start with ["alice"], truncated to two levels deep.
const namespaces = await store.listNamespaces({ prefix: ["alice"], maxDepth: 2 });

语义搜索

Beyond simple retrieval, the store also supports semantic search, allowing you to find memories based on meaning rather than exact matches. To enable this, configure the store with an embedding model:
import { OpenAIEmbeddings } from "@langchain/openai";

const store = new InMemoryStore({
  index: {
    embeddings: new OpenAIEmbeddings({ model: "text-embedding-3-small" }),
    dims: 1536,
    fields: ["food_preference", "$"], // Fields to embed
  },
});
Now when searching, you can use natural language queries to find relevant memories:
// Find memories about food preferences
// (This can be done after putting memories into the store)
const memories = await store.search(namespaceForMemory, {
  query: "What does the user like to eat?",
  limit: 3, // Return top 3 matches
});
You can control which parts of your memories get embedded by configuring the fields parameter or by specifying the index parameter when storing memories:
// Store with specific fields to embed
await store.put(
  namespaceForMemory,
  uuidv4(),
  {
    food_preference: "I love Italian cuisine",
    context: "Discussing dinner plans",
  },
  { index: ["food_preference"] } // Only embed "food_preferences" field
);

// Store without embedding (still retrievable, but not searchable)
await store.put(
  namespaceForMemory,
  uuidv4(),
  { system_info: "Last updated: 2024-01-01" },
  { index: false }
);

在 LangGraph 中使用

With this all in place, we use the memoryStore in LangGraph. The memoryStore works hand-in-hand with the checkpointer: the checkpointer saves state to threads, as discussed above, and the memoryStore allows us to store arbitrary information for access across threads. We compile the graph with both the checkpointer and the memoryStore as follows.
import { MemorySaver } from "@langchain/langgraph";

// We need this because we want to enable threads (conversations)
const checkpointer = new MemorySaver();

// ... Define the graph ...

// Compile the graph with the checkpointer and store
const graph = workflow.compile({ checkpointer, store: memoryStore });
We invoke the graph with a thread_id, as before, and also with a user_id, which we’ll use to namespace our memories to this particular user as we showed above.
// Invoke the graph
const userId = "1";
const config = { configurable: { thread_id: "1" }, context: { userId } };

// First let's just say hi to the AI
for await (const update of await graph.stream(
  { messages: [{ role: "user", content: "hi" }] },
  { ...config, streamMode: "updates" }
)) {
  console.log(update);
}
You can access the store and the userId in any node with the runtime argument. Here’s how you might use it to save memories:
import { StateSchema, MessagesValue, Runtime } from "@langchain/langgraph";
import { v4 as uuidv4 } from "uuid";

const MessagesState = new StateSchema({
  messages: MessagesValue,
});

const updateMemory: GraphNode<typeof MessagesState> = async (state, runtime) => {
  // Get the user id from the config
  const userId = runtime.context?.user_id;
  if (!userId) throw new Error("User ID is required");

  // Namespace the memory
  const namespace = [userId, "memories"];

  // ... Analyze conversation and create a new memory
  const memory = "Some memory content";

  // Create a new memory ID
  const memoryId = uuidv4();

  // We create a new memory
  await runtime.store?.put(namespace, memoryId, { memory });
};
As we showed above, we can also access the store in any node and use the store.search method to get memories. Recall the memories are returned as a list of objects that can be converted to a dictionary.
memories[memories.length - 1];
// {
//   value: { food_preference: 'I like pizza' },
//   key: '07e0caf4-1631-47b7-b15f-65515d4c1843',
//   namespace: ['1', 'memories'],
//   createdAt: '2024-10-02T17:22:31.590602+00:00',
//   updatedAt: '2024-10-02T17:22:31.590605+00:00'
// }
We can access the memories and use them in our model call.
const callModel: GraphNode<typeof MessagesState> = async (state, runtime) => {
  // Get the user id from the config
  const userId = runtime.context?.user_id;

  // Namespace the memory
  const namespace = [userId, "memories"];

  // Search based on the most recent message
  const memories = await runtime.store?.search(namespace, {
    query: state.messages[state.messages.length - 1].content,
    limit: 3,
  });
  const info = memories.map((d) => d.value.memory).join("\n");

  // ... Use memories in the model call
};
If we create a new thread, we can still access the same memories so long as the user_id is the same.
// Invoke the graph
const config = { configurable: { thread_id: "2" }, context: { userId: "1" } };

// Let's say hi again
for await (const update of await graph.stream(
  { messages: [{ role: "user", content: "hi, tell me about my memories" }] },
  { ...config, streamMode: "updates" }
)) {
  console.log(update);
}
When we use the LangSmith, either locally (e.g., in Studio) or hosted with LangSmith, the base store is available to use by default and does not need to be specified during graph compilation. To enable semantic search, however, you do need to configure the indexing settings in your langgraph.json file. For example:
{
    ...
    "store": {
        "index": {
            "embed": "openai:text-embeddings-3-small",
            "dims": 1536,
            "fields": ["$"]
        }
    }
}
See the deployment guide for more details and configuration options.

优化检查点存储

检查点器库

Under the hood, checkpointing is powered by checkpointer objects that conform to BaseCheckpointSaver interface. LangGraph provides several checkpointer implementations, all implemented via standalone, installable libraries.
  • @langchain/langgraph-checkpoint: The base interface for checkpointer savers (BaseCheckpointSaver) and serialization/deserialization interface (SerializerProtocol). Includes in-memory checkpointer implementation (MemorySaver) for experimentation. LangGraph comes with @langchain/langgraph-checkpoint included.
  • @langchain/langgraph-checkpoint-sqlite: An implementation of LangGraph checkpointer that uses SQLite database (SqliteSaver). Ideal for experimentation and local workflows. Needs to be installed separately.
  • @langchain/langgraph-checkpoint-postgres: An advanced checkpointer that uses Postgres database (PostgresSaver), used in LangSmith. Ideal for using in production. Needs to be installed separately.
  • @langchain/langgraph-checkpoint-mongodb: An advanced checkpointer (MongoDBSaver) and long-term memory store (MongoDBStore) backed by MongoDB. The store supports cross-thread persistence with optional integrated vector search. Ideal for production use. Needs to be installed separately.
  • @langchain/langgraph-checkpoint-redis: An advanced checkpointer that uses Redis database (RedisSaver). Ideal for using in production. Needs to be installed separately.

检查点器接口

Each checkpointer conforms to the BaseCheckpointSaver interface and implements the following methods:
  • .put - Store a checkpoint with its configuration and metadata.
  • .putWrites - Store intermediate writes linked to a checkpoint (i.e. pending writes).
  • .getTuple - Fetch a checkpoint tuple using for a given configuration (thread_id and checkpoint_id). This is used to populate StateSnapshot in graph.getState().
  • .list - List checkpoints that match a given configuration and filter criteria. This is used to populate state history in graph.getStateHistory()