> ## Documentation Index
> Fetch the complete documentation index at: https://nvd-54.mintlify.site/llms.txt
> Use this file to discover all available pages before exploring further.
# 子图
本指南介绍使用子图的机制。子图是在另一个[图](/oss/python/langgraph/graph-api#graphs)中作为[节点](/oss/python/langgraph/graph-api#nodes)使用的图。
子图适用于:
* 构建[多智能体系统](/oss/python/langchain/multi-agent)
* 在多个图中复用一组节点
* 分布式开发:当你希望不同团队独立开发图的不同部分时,可以将每个部分定义为子图,只要子图接口(输入和输出模式)得到遵守,父图就可以在不了解子图任何细节的情况下构建
## 设置
```bash pip theme={"theme":{"light":"catppuccin-latte","dark":"catppuccin-mocha"}}
pip install -U langgraph
```
```bash uv theme={"theme":{"light":"catppuccin-latte","dark":"catppuccin-mocha"}}
uv add langgraph
```
**为 LangGraph 开发设置 LangSmith**
注册 [LangSmith](https://smith.langchain.com?utm_source=docs\&utm_medium=cta\&utm_campaign=langsmith-signup\&utm_content=oss-langgraph-use-subgraphs) 以快速发现问题并提升 LangGraph 项目的性能。LangSmith 让你使用追踪数据来调试、测试和监控使用 LangGraph 构建的 LLM 应用——了解更多关于[如何开始使用 LangSmith](https://docs.smith.langchain.com)。
## 定义子图通信
添加子图时,你需要定义父图和子图如何通信:
| 模式 | 何时使用 | 状态模式 |
| ------------------------------------------ | -------------------------------------- | ------------------------------------ |
| [在节点内调用子图](#call-a-subgraph-inside-a-node) | 父图和子图有**不同的状态模式**(没有共享键),或你需要在它们之间转换状态 | 你编写一个包装函数,将父图状态映射到子图输入,并将子图输出映射回父图状态 |
| [将子图添加为节点](#add-a-subgraph-as-a-node) | 父图和子图**共享状态键**——子图从父图的相同通道读取和写入 | 你直接将编译后的子图传递给 `add_node`——不需要包装函数 |
### 在节点内调用子图
当父图和子图有**不同的状态模式**(没有共享键)时,在节点函数内调用子图。这在[多智能体](/oss/python/langchain/multi-agent)系统中很常见,例如你希望为每个智能体维护私有消息历史时。
节点函数在调用子图之前将父图状态转换为子图状态,并在返回之前将结果转换回父图状态。
```python theme={"theme":{"light":"catppuccin-latte","dark":"catppuccin-mocha"}}
from typing_extensions import TypedDict
from langgraph.graph.state import StateGraph, START
class SubgraphState(TypedDict):
bar: str
# 子图
def subgraph_node_1(state: SubgraphState):
return {"bar": "hi! " + state["bar"]}
subgraph_builder = StateGraph(SubgraphState)
subgraph_builder.add_node(subgraph_node_1)
subgraph_builder.add_edge(START, "subgraph_node_1")
subgraph = subgraph_builder.compile()
# 父图
class State(TypedDict):
foo: str
def call_subgraph(state: State):
# 将状态转换为子图状态
subgraph_output = subgraph.invoke({"bar": state["foo"]}) # [!code highlight]
# 将响应转换回父图状态
return {"foo": subgraph_output["bar"]}
builder = StateGraph(State)
builder.add_node("node_1", call_subgraph)
builder.add_edge(START, "node_1")
graph = builder.compile()
```
```python theme={"theme":{"light":"catppuccin-latte","dark":"catppuccin-mocha"}}
from typing_extensions import TypedDict
from langgraph.graph.state import StateGraph, START
# 定义子图
class SubgraphState(TypedDict):
# 注意这些键都不与父图状态共享
bar: str
baz: str
def subgraph_node_1(state: SubgraphState):
return {"baz": "baz"}
def subgraph_node_2(state: SubgraphState):
return {"bar": state["bar"] + state["baz"]}
subgraph_builder = StateGraph(SubgraphState)
subgraph_builder.add_node(subgraph_node_1)
subgraph_builder.add_node(subgraph_node_2)
subgraph_builder.add_edge(START, "subgraph_node_1")
subgraph_builder.add_edge("subgraph_node_1", "subgraph_node_2")
subgraph = subgraph_builder.compile()
# 定义父图
class ParentState(TypedDict):
foo: str
def node_1(state: ParentState):
return {"foo": "hi! " + state["foo"]}
def node_2(state: ParentState):
# 将状态转换为子图状态
response = subgraph.invoke({"bar": state["foo"]})
# 将响应转换回父图状态
return {"foo": response["bar"]}
builder = StateGraph(ParentState)
builder.add_node("node_1", node_1)
builder.add_node("node_2", node_2)
builder.add_edge(START, "node_1")
builder.add_edge("node_1", "node_2")
graph = builder.compile()
for chunk in graph.stream({"foo": "foo"}, subgraphs=True, version="v2"):
if chunk["type"] == "updates":
print(chunk["ns"], chunk["data"])
```
```
() {'node_1': {'foo': 'hi! foo'}}
('node_2:577b710b-64ae-31fb-9455-6a4d4cc2b0b9',) {'subgraph_node_1': {'baz': 'baz'}}
('node_2:577b710b-64ae-31fb-9455-6a4d4cc2b0b9',) {'subgraph_node_2': {'bar': 'hi! foobaz'}}
() {'node_2': {'foo': 'hi! foobaz'}}
```
这是一个两级子图的示例:父图 -> 子图 -> 孙图。
```python theme={"theme":{"light":"catppuccin-latte","dark":"catppuccin-mocha"}}
# 孙图
from typing_extensions import TypedDict
from langgraph.graph.state import StateGraph, START, END
class GrandChildState(TypedDict):
my_grandchild_key: str
def grandchild_1(state: GrandChildState) -> GrandChildState:
# 注意:子图或父图的键在此处不可访问
return {"my_grandchild_key": state["my_grandchild_key"] + ", how are you"}
grandchild = StateGraph(GrandChildState)
grandchild.add_node("grandchild_1", grandchild_1)
grandchild.add_edge(START, "grandchild_1")
grandchild.add_edge("grandchild_1", END)
grandchild_graph = grandchild.compile()
# 子图
class ChildState(TypedDict):
my_child_key: str
def call_grandchild_graph(state: ChildState) -> ChildState:
# 注意:父图或孙图的键在此处不可访问
grandchild_graph_input = {"my_grandchild_key": state["my_child_key"]}
grandchild_graph_output = grandchild_graph.invoke(grandchild_graph_input)
return {"my_child_key": grandchild_graph_output["my_grandchild_key"] + " today?"}
child = StateGraph(ChildState)
# 这里传递的是函数而非编译后的图(`grandchild_graph`)
child.add_node("child_1", call_grandchild_graph)
child.add_edge(START, "child_1")
child.add_edge("child_1", END)
child_graph = child.compile()
# 父图
class ParentState(TypedDict):
my_key: str
def parent_1(state: ParentState) -> ParentState:
# 注意:子图或孙图的键在此处不可访问
return {"my_key": "hi " + state["my_key"]}
def parent_2(state: ParentState) -> ParentState:
return {"my_key": state["my_key"] + " bye!"}
def call_child_graph(state: ParentState) -> ParentState:
child_graph_input = {"my_child_key": state["my_key"]}
child_graph_output = child_graph.invoke(child_graph_input)
return {"my_key": child_graph_output["my_child_key"]}
parent = StateGraph(ParentState)
parent.add_node("parent_1", parent_1)
# 这里传递的是函数而非编译后的图(`child_graph`)
parent.add_node("child", call_child_graph)
parent.add_node("parent_2", parent_2)
parent.add_edge(START, "parent_1")
parent.add_edge("parent_1", "child")
parent.add_edge("child", "parent_2")
parent.add_edge("parent_2", END)
parent_graph = parent.compile()
for chunk in parent_graph.stream({"my_key": "Bob"}, subgraphs=True, version="v2"):
if chunk["type"] == "updates":
print(chunk["ns"], chunk["data"])
```
```
() {'parent_1': {'my_key': 'hi Bob'}}
('child:2e26e9ce-602f-862c-aa66-1ea5a4655e3b', 'child_1:781bb3b1-3971-84ce-810b-acf819a03f9c') {'grandchild_1': {'my_grandchild_key': 'hi Bob, how are you'}}
('child:2e26e9ce-602f-862c-aa66-1ea5a4655e3b',) {'child_1': {'my_child_key': 'hi Bob, how are you today?'}}
() {'child': {'my_key': 'hi Bob, how are you today?'}}
() {'parent_2': {'my_key': 'hi Bob, how are you today? bye!'}}
```
### 将子图添加为节点
当父图和子图**共享状态键**时,你可以直接将编译后的子图传递给 `add_node`。不需要包装函数——子图会自动从父图的状态通道读取和写入。例如,在[多智能体](/oss/python/langchain/multi-agent)系统中,智能体通常通过共享的 [messages](/oss/python/langgraph/graph-api#why-use-messages) 键进行通信。
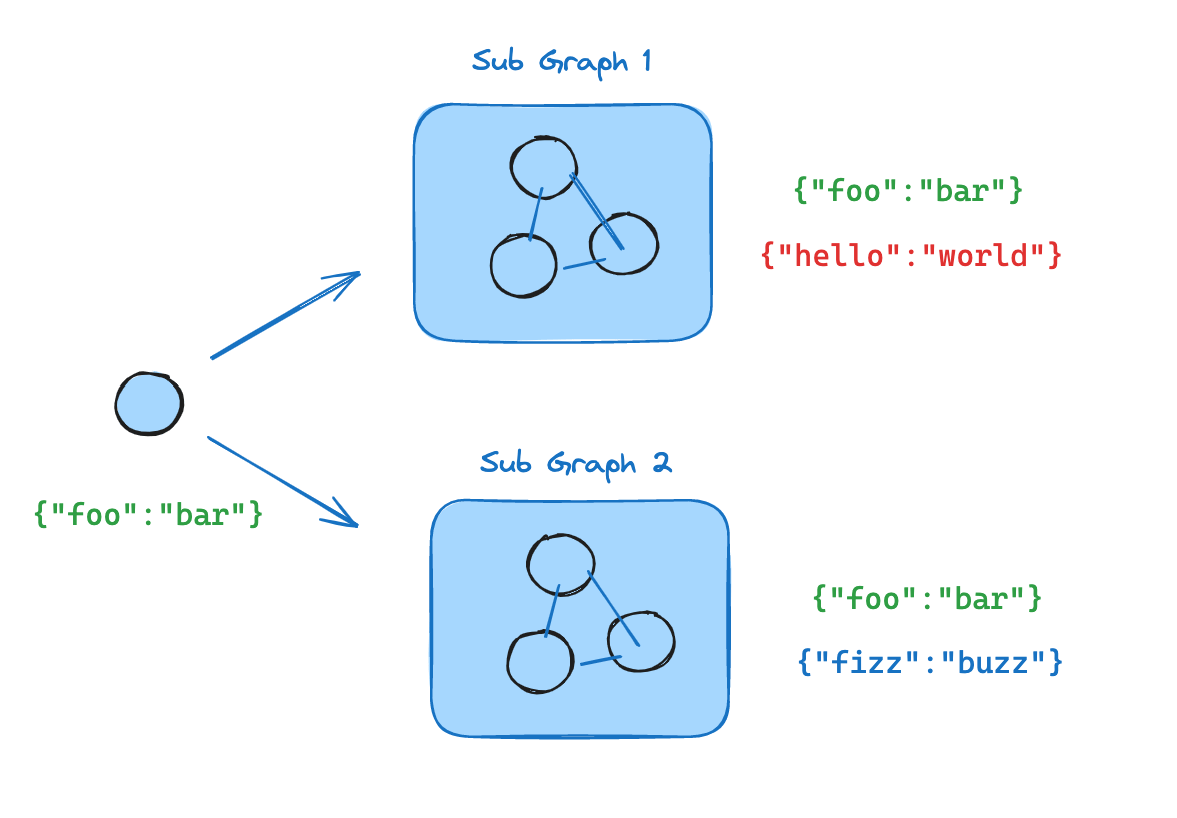 如果你的子图与父图共享状态键,可以按照以下步骤将其添加到图中:
1. 定义子图工作流(下面示例中的 `subgraph_builder`)并编译它
2. 在定义父图工作流时,将编译后的子图传递给 [`add_node`](https://reference.langchain.com/python/langgraph/graph/state/StateGraph/add_node) 方法
```python theme={"theme":{"light":"catppuccin-latte","dark":"catppuccin-mocha"}}
from typing_extensions import TypedDict
from langgraph.graph.state import StateGraph, START
class State(TypedDict):
foo: str
# 子图
def subgraph_node_1(state: State):
return {"foo": "hi! " + state["foo"]}
subgraph_builder = StateGraph(State)
subgraph_builder.add_node(subgraph_node_1)
subgraph_builder.add_edge(START, "subgraph_node_1")
subgraph = subgraph_builder.compile()
# 父图
builder = StateGraph(State)
builder.add_node("node_1", subgraph) # [!code highlight]
builder.add_edge(START, "node_1")
graph = builder.compile()
```
```python theme={"theme":{"light":"catppuccin-latte","dark":"catppuccin-mocha"}}
from typing_extensions import TypedDict
from langgraph.graph.state import StateGraph, START
# 定义子图
class SubgraphState(TypedDict):
foo: str # 与父图状态共享
bar: str # SubgraphState 私有
def subgraph_node_1(state: SubgraphState):
return {"bar": "bar"}
def subgraph_node_2(state: SubgraphState):
# 注意此节点使用的状态键('bar')仅在子图中可用
# 并在共享状态键('foo')上发送更新
return {"foo": state["foo"] + state["bar"]}
subgraph_builder = StateGraph(SubgraphState)
subgraph_builder.add_node(subgraph_node_1)
subgraph_builder.add_node(subgraph_node_2)
subgraph_builder.add_edge(START, "subgraph_node_1")
subgraph_builder.add_edge("subgraph_node_1", "subgraph_node_2")
subgraph = subgraph_builder.compile()
# 定义父图
class ParentState(TypedDict):
foo: str
def node_1(state: ParentState):
return {"foo": "hi! " + state["foo"]}
builder = StateGraph(ParentState)
builder.add_node("node_1", node_1)
builder.add_node("node_2", subgraph)
builder.add_edge(START, "node_1")
builder.add_edge("node_1", "node_2")
graph = builder.compile()
for chunk in graph.stream({"foo": "foo"}, version="v2"):
if chunk["type"] == "updates":
print(chunk["data"])
```
```
{'node_1': {'foo': 'hi! foo'}}
{'node_2': {'foo': 'hi! foobar'}}
```
## 子图持久化
使用子图时,你需要决定其内部数据在多次调用之间如何处理。考虑一个委托给专家子智能体的客服机器人:计费专家子智能体应该记住客户之前的问题,还是每次调用都重新开始?
`.compile()` 上的 `checkpointer` 参数控制子图持久化:
| 模式 | `checkpointer=` | 行为 |
| ------------------------------- | --------------- | ------------------------------------------------------------------------------------------------------------------- |
| [每次调用](#per-invocation-default) | `None`(默认) | 每次调用从头开始,并继承父图的检查点器以在单次调用内支持[中断](/oss/python/langgraph/interrupts)和[持久执行](/oss/python/langgraph/durable-execution)。 |
| [每线程](#per-thread) | `True` | 状态在同一线程上跨调用累积。每次调用从上次结束的地方继续。 |
| [无状态](#stateless) | `False` | 完全没有检查点——像普通函数调用一样运行。不支持中断或持久执行。 |
每次调用模式适用于大多数应用,包括子智能体处理独立请求的[多智能体](/oss/python/langchain/multi-agent)系统。当子智能体需要多轮对话记忆时使用每线程模式(例如,在多次交换中积累上下文的研究助手)。
父图必须使用检查点器编译,子图持久化功能(中断、状态检查、每线程记忆)才能工作。参见[持久化](/oss/python/langgraph/persistence)。
下面的示例使用 LangChain 的 [`create_agent`](https://reference.langchain.com/python/langchain/agents/factory/create_agent),这是构建智能体的常见方式。`create_agent` 在底层生成一个 [LangGraph 图](/oss/python/langgraph/graph-api),因此所有子图持久化概念都直接适用。如果你使用原始 LangGraph `StateGraph` 构建,相同的模式和配置选项同样适用——详见[图 API](/oss/python/langgraph/graph-api)。
### 有状态
有状态子图继承父图的检查点器,这使得[中断](/oss/python/langgraph/interrupts)、[持久执行](/oss/python/langgraph/durable-execution)和状态检查成为可能。两种有状态模式的区别在于状态保留的时间长度。
#### 每次调用(默认)
这是大多数应用的推荐模式,包括子智能体作为工具调用的[多智能体](/oss/python/langchain/multi-agent)系统。它支持中断、[持久执行](/oss/python/langgraph/durable-execution)和并行调用,同时保持每次调用的隔离。
当子图的每次调用是独立的,且子智能体不需要记住之前调用的任何内容时,使用每次调用持久化。这是最常见的模式,特别是对于子智能体处理一次性请求(如"查找此客户的订单"或"总结此文档")的[多智能体](/oss/python/langchain/multi-agent)系统。
省略 `checkpointer` 或将其设置为 `None`。每次调用从头开始,但在单次调用内子图继承父图的检查点器,并可以使用 `interrupt()` 暂停和恢复。
以下示例使用两个子智能体(水果专家、蔬菜专家)作为外部智能体的工具包装:
```python theme={"theme":{"light":"catppuccin-latte","dark":"catppuccin-mocha"}}
from langchain.agents import create_agent
from langchain.tools import tool
from langgraph.checkpoint.memory import MemorySaver
from langgraph.types import Command, interrupt
@tool
def fruit_info(fruit_name: str) -> str:
"""查询水果信息。"""
return f"Info about {fruit_name}"
@tool
def veggie_info(veggie_name: str) -> str:
"""查询蔬菜信息。"""
return f"Info about {veggie_name}"
# 子智能体 - 不设置 checkpointer(继承父图)
fruit_agent = create_agent(
model="gpt-5.4-mini",
tools=[fruit_info],
prompt="You are a fruit expert. Use the fruit_info tool. Respond in one sentence.",
)
veggie_agent = create_agent(
model="gpt-5.4-mini",
tools=[veggie_info],
prompt="You are a veggie expert. Use the veggie_info tool. Respond in one sentence.",
)
# 将子智能体包装为外部智能体的工具
@tool
def ask_fruit_expert(question: str) -> str:
"""咨询水果专家。用于所有水果问题。"""
response = fruit_agent.invoke(
{"messages": [{"role": "user", "content": question}]},
)
return response["messages"][-1].content
@tool
def ask_veggie_expert(question: str) -> str:
"""咨询蔬菜专家。用于所有蔬菜问题。"""
response = veggie_agent.invoke(
{"messages": [{"role": "user", "content": question}]},
)
return response["messages"][-1].content
# 带检查点器的外部智能体
agent = create_agent(
model="gpt-5.4-mini",
tools=[ask_fruit_expert, ask_veggie_expert],
prompt=(
"You have two experts: ask_fruit_expert and ask_veggie_expert. "
"ALWAYS delegate questions to the appropriate expert."
),
checkpointer=MemorySaver(),
)
```
每次调用都可以使用 `interrupt()` 暂停和恢复。在工具函数中添加 `interrupt()` 以在继续之前要求用户确认:
```python theme={"theme":{"light":"catppuccin-latte","dark":"catppuccin-mocha"}}
@tool
def fruit_info(fruit_name: str) -> str:
"""查询水果信息。"""
interrupt("continue?") # [!code highlight]
return f"Info about {fruit_name}"
```
```python theme={"theme":{"light":"catppuccin-latte","dark":"catppuccin-mocha"}}
config = {"configurable": {"thread_id": "1"}}
# 调用 - 子智能体的工具调用了 interrupt()
response = agent.invoke(
{"messages": [{"role": "user", "content": "Tell me about apples"}]},
config=config,
)
# response 包含 __interrupt__
# 恢复 - 批准中断
response = agent.invoke(Command(resume=True), config=config) # [!code highlight]
# 子智能体消息数量:4
```
每次调用都从全新的子智能体状态开始。子智能体不记得之前的调用:
```python theme={"theme":{"light":"catppuccin-latte","dark":"catppuccin-mocha"}}
config = {"configurable": {"thread_id": "1"}}
# 第一次调用
response = agent.invoke(
{"messages": [{"role": "user", "content": "Tell me about apples"}]},
config=config,
)
# 子智能体消息数量:4
# 第二次调用 - 子智能体重新开始,不记得苹果
response = agent.invoke(
{"messages": [{"role": "user", "content": "Now tell me about bananas"}]},
config=config,
)
# 子智能体消息数量:4(仍然是全新的!)
```
对同一子图的多次调用不会冲突,因为每次调用都有自己的检查点命名空间:
```python theme={"theme":{"light":"catppuccin-latte","dark":"catppuccin-mocha"}}
config = {"configurable": {"thread_id": "1"}}
# LLM 为苹果和香蕉分别调用 ask_fruit_expert
response = agent.invoke(
{"messages": [{"role": "user", "content": "Tell me about apples and bananas"}]},
config=config,
)
# 子智能体消息数量:4(苹果 - 全新)
# 子智能体消息数量:4(香蕉 - 全新)
```
#### 每线程
当子智能体需要记住之前的交互时使用每线程持久化。例如,在多次交换中积累上下文的研究助手,或跟踪已编辑文件的编程助手。子智能体的对话历史和数据在同一线程上跨调用累积。每次调用从上次结束的地方继续。
使用 `checkpointer=True` 编译以启用此行为。
每线程子图不支持并行工具调用。当 LLM 可以访问每线程子智能体作为工具时,它可能会尝试并行多次调用该工具(例如,同时询问水果专家关于苹果和香蕉的问题)。这会导致检查点冲突,因为两次调用都写入同一命名空间。
下面的示例使用 LangChain 的 `ToolCallLimitMiddleware` 来防止此问题。如果你使用纯 LangGraph `StateGraph` 构建,你需要自行防止并行工具调用——例如,通过配置模型禁用并行工具调用,或通过添加逻辑确保同一子图不会被并行调用多次。
以下示例使用带 `checkpointer=True` 编译的水果专家子智能体:
```python theme={"theme":{"light":"catppuccin-latte","dark":"catppuccin-mocha"}}
from langchain.agents import create_agent
from langchain.agents.middleware import ToolCallLimitMiddleware
from langchain.tools import tool
from langgraph.checkpoint.memory import MemorySaver
from langgraph.types import Command, interrupt
@tool
def fruit_info(fruit_name: str) -> str:
"""查询水果信息。"""
return f"Info about {fruit_name}"
# 带 checkpointer=True 的子智能体用于持久状态
fruit_agent = create_agent(
model="gpt-5.4-mini",
tools=[fruit_info],
prompt="You are a fruit expert. Use the fruit_info tool. Respond in one sentence.",
checkpointer=True, # [!code highlight]
)
# 将子智能体包装为外部智能体的工具
@tool
def ask_fruit_expert(question: str) -> str:
"""咨询水果专家。用于所有水果问题。"""
response = fruit_agent.invoke(
{"messages": [{"role": "user", "content": question}]},
)
return response["messages"][-1].content
# 带检查点器的外部智能体
# 使用 ToolCallLimitMiddleware 防止对每线程子智能体的并行调用,
# 否则会导致检查点冲突。
agent = create_agent(
model="gpt-5.4-mini",
tools=[ask_fruit_expert],
prompt="You have a fruit expert. ALWAYS delegate fruit questions to ask_fruit_expert.",
middleware=[ # [!code highlight]
ToolCallLimitMiddleware(tool_name="ask_fruit_expert", run_limit=1), # [!code highlight]
], # [!code highlight]
checkpointer=MemorySaver(),
)
```
每线程子智能体像每次调用模式一样支持 `interrupt()`。在工具函数中添加 `interrupt()` 以要求用户确认:
```python theme={"theme":{"light":"catppuccin-latte","dark":"catppuccin-mocha"}}
@tool
def fruit_info(fruit_name: str) -> str:
"""查询水果信息。"""
interrupt("continue?") # [!code highlight]
return f"Info about {fruit_name}"
```
```python theme={"theme":{"light":"catppuccin-latte","dark":"catppuccin-mocha"}}
config = {"configurable": {"thread_id": "1"}}
# 调用 - 子智能体的工具调用了 interrupt()
response = agent.invoke(
{"messages": [{"role": "user", "content": "Tell me about apples"}]},
config=config,
)
# response 包含 __interrupt__
# 恢复 - 批准中断
response = agent.invoke(Command(resume=True), config=config) # [!code highlight]
# 子智能体消息数量:4
```
状态在多次调用之间累积——子智能体记住过去的对话:
```python theme={"theme":{"light":"catppuccin-latte","dark":"catppuccin-mocha"}}
config = {"configurable": {"thread_id": "1"}}
# 第一次调用
response = agent.invoke(
{"messages": [{"role": "user", "content": "Tell me about apples"}]},
config=config,
)
# 子智能体消息数量:4
# 第二次调用 - 子智能体记住苹果的对话
response = agent.invoke(
{"messages": [{"role": "user", "content": "Now tell me about bananas"}]},
config=config,
)
# 子智能体消息数量:8(累积的!)
```
当你有多个**不同的**每线程子图(例如水果专家和蔬菜专家)时,每个子图需要自己的存储空间,这样它们的检查点不会互相覆盖。这称为**命名空间隔离**。
如果你[在节点内调用子图](#call-a-subgraph-inside-a-node),LangGraph 根据调用顺序(第一次调用、第二次调用等)分配命名空间。这意味着重新排列调用可能会混淆哪个子图加载哪个状态。为避免这种情况,将每个子智能体包装在自己的 `StateGraph` 中并使用唯一的节点名——这为每个子图提供了稳定、唯一的命名空间:
```python theme={"theme":{"light":"catppuccin-latte","dark":"catppuccin-mocha"}}
from langgraph.graph import MessagesState, StateGraph
def create_sub_agent(model, *, name, **kwargs):
"""用唯一的节点名包装智能体以实现命名空间隔离。"""
agent = create_agent(model=model, name=name, **kwargs)
return (
StateGraph(MessagesState)
.add_node(name, agent) # 唯一名称 -> 稳定命名空间 # [!code highlight]
.add_edge("__start__", name)
.compile()
)
fruit_agent = create_sub_agent(
"gpt-5.4-mini", name="fruit_agent",
tools=[fruit_info], prompt="...", checkpointer=True,
)
veggie_agent = create_sub_agent(
"gpt-5.4-mini", name="veggie_agent",
tools=[veggie_info], prompt="...", checkpointer=True,
)
config = {"configurable": {"thread_id": "1"}}
# 第一次调用 - LLM 同时调用水果和蔬菜专家
response = agent.invoke(
{"messages": [{"role": "user", "content": "Tell me about cherries and broccoli"}]},
config=config,
)
# 水果子智能体消息数量:4
# 蔬菜子智能体消息数量:4
# 第二次调用 - 两个智能体独立累积
response = agent.invoke(
{"messages": [{"role": "user", "content": "Now tell me about oranges and carrots"}]},
config=config,
)
# 水果子智能体消息数量:8(记住樱桃!)
# 蔬菜子智能体消息数量:8(记住西兰花!)
```
[作为节点添加的](#add-a-subgraph-as-a-node)子图已经自动获得基于名称的命名空间,因此不需要此包装。
### 无状态
当你想像普通函数调用一样运行子智能体而没有检查点开销时使用此模式。子图无法暂停/恢复,也不能从[持久执行](/oss/python/langgraph/persistence)中受益。使用 `checkpointer=False` 编译。
没有检查点,子图就没有持久执行。如果进程在运行中途崩溃,子图无法恢复,必须从头开始重新运行。
```python theme={"theme":{"light":"catppuccin-latte","dark":"catppuccin-mocha"}}
subgraph_builder = StateGraph(...)
subgraph = subgraph_builder.compile(checkpointer=False) # [!code highlight]
```
### 检查点器参考
通过 `.compile()` 上的 `checkpointer` 参数控制子图持久化:
```python theme={"theme":{"light":"catppuccin-latte","dark":"catppuccin-mocha"}}
subgraph = builder.compile(checkpointer=False) # 或 True / None
```
| 功能 | 每次调用(默认) | 每线程 | 无状态 |
| --------------- | ----------------------------------------------------------------------------------- | ----------------------------------------------------------------- | ------- |
| `checkpointer=` | `None` | `True` | `False` |
| 中断 (HITL) | ✅ | ✅ | ❌ |
| 多轮记忆 | ❌ | ✅ | ❌ |
| 多次调用(不同子图) | ✅ | ⚠️ | ✅ |
| 多次调用(相同子图) | ✅ | ❌ | ✅ |
| 状态检查 | ⚠️ | ✅ | ❌ |
* **中断 (HITL)**:子图可以使用 [interrupt()](/oss/python/langgraph/interrupts) 暂停执行并等待用户输入,然后从暂停处恢复。
* **多轮记忆**:子图在同一[线程](/oss/python/langgraph/persistence#threads)的多次调用之间保留状态。每次调用从上次结束的地方继续,而不是重新开始。
* **多次调用(不同子图)**:可以在单个节点内调用多个不同的子图实例而不会产生检查点命名空间冲突。
* **多次调用(相同子图)**:可以在单个节点内多次调用同一子图实例。使用有状态持久化时,这些调用写入同一检查点命名空间并产生冲突——请改用每次调用持久化。
* **状态检查**:子图的状态可通过 `get_state(config, subgraphs=True)` 获取,用于调试和监控。
## 查看子图状态
启用[持久化](/oss/python/langgraph/persistence)后,你可以使用 subgraphs 选项检查子图状态。使用[无状态](#stateless)检查点(`checkpointer=False`)时,不会保存子图检查点,因此子图状态不可用。
查看子图状态需要 LangGraph 能够**静态发现**子图——即它是[作为节点添加的](#add-a-subgraph-as-a-node)或[在节点内调用的](#call-a-subgraph-inside-a-node)。当子图在[工具](/oss/python/langchain/tools)函数或其他间接方式中调用时(例如[子智能体](/oss/python/langchain/multi-agent/subagents)模式),此功能不起作用。无论嵌套层级如何,中断仍然会传播到顶层图。
仅返回**当前调用**的子图状态。每次调用都从头开始。
```python theme={"theme":{"light":"catppuccin-latte","dark":"catppuccin-mocha"}}
from langgraph.graph import START, StateGraph
from langgraph.checkpoint.memory import MemorySaver
from langgraph.types import interrupt, Command
from typing_extensions import TypedDict
class State(TypedDict):
foo: str
# 子图
def subgraph_node_1(state: State):
value = interrupt("Provide value:")
return {"foo": state["foo"] + value}
subgraph_builder = StateGraph(State)
subgraph_builder.add_node(subgraph_node_1)
subgraph_builder.add_edge(START, "subgraph_node_1")
subgraph = subgraph_builder.compile() # 继承父图检查点器
# 父图
builder = StateGraph(State)
builder.add_node("node_1", subgraph)
builder.add_edge(START, "node_1")
checkpointer = MemorySaver()
graph = builder.compile(checkpointer=checkpointer)
config = {"configurable": {"thread_id": "1"}}
graph.invoke({"foo": ""}, config)
# 查看当前调用的子图状态
subgraph_state = graph.get_state(config, subgraphs=True).tasks[0].state # [!code highlight]
# 恢复子图
graph.invoke(Command(resume="bar"), config)
```
返回此线程上所有调用**累积的**子图状态。
```python theme={"theme":{"light":"catppuccin-latte","dark":"catppuccin-mocha"}}
from langgraph.graph import START, StateGraph, MessagesState
from langgraph.checkpoint.memory import MemorySaver
# 带有自己持久状态的子图
subgraph_builder = StateGraph(MessagesState)
# ... 添加节点和边
subgraph = subgraph_builder.compile(checkpointer=True) # [!code highlight]
# 父图
builder = StateGraph(MessagesState)
builder.add_node("agent", subgraph)
builder.add_edge(START, "agent")
checkpointer = MemorySaver()
graph = builder.compile(checkpointer=checkpointer)
config = {"configurable": {"thread_id": "1"}}
graph.invoke({"messages": [{"role": "user", "content": "hi"}]}, config)
graph.invoke({"messages": [{"role": "user", "content": "what did I say?"}]}, config)
# 查看累积的子图状态(包含两次调用的消息)
subgraph_state = graph.get_state(config, subgraphs=True).tasks[0].state # [!code highlight]
```
## 流式输出子图
要在流式输出中包含子图的输出,你可以在父图的 stream 方法中设置 subgraphs 选项。这将流式输出父图和任何子图的输出。
使用 `version="v2"` 时,子图事件使用相同的 `StreamPart` 格式。`ns` 字段标识来源图:
```python theme={"theme":{"light":"catppuccin-latte","dark":"catppuccin-mocha"}}
for chunk in graph.stream(
{"foo": "foo"},
subgraphs=True, # [!code highlight]
stream_mode="updates",
version="v2", # [!code highlight]
):
print(chunk["type"]) # "updates"
print(chunk["ns"]) # () 表示根图,("node_2:",) 表示子图
print(chunk["data"]) # {"node_name": {"key": "value"}}
```
```python theme={"theme":{"light":"catppuccin-latte","dark":"catppuccin-mocha"}}
for chunk in graph.stream(
{"foo": "foo"},
subgraphs=True, # [!code highlight]
stream_mode="updates",
):
print(chunk)
```
```python theme={"theme":{"light":"catppuccin-latte","dark":"catppuccin-mocha"}}
from typing_extensions import TypedDict
from langgraph.graph.state import StateGraph, START
# 定义子图
class SubgraphState(TypedDict):
foo: str
bar: str
def subgraph_node_1(state: SubgraphState):
return {"bar": "bar"}
def subgraph_node_2(state: SubgraphState):
# 注意此节点使用的状态键('bar')仅在子图中可用
# 并在共享状态键('foo')上发送更新
return {"foo": state["foo"] + state["bar"]}
subgraph_builder = StateGraph(SubgraphState)
subgraph_builder.add_node(subgraph_node_1)
subgraph_builder.add_node(subgraph_node_2)
subgraph_builder.add_edge(START, "subgraph_node_1")
subgraph_builder.add_edge("subgraph_node_1", "subgraph_node_2")
subgraph = subgraph_builder.compile()
# 定义父图
class ParentState(TypedDict):
foo: str
def node_1(state: ParentState):
return {"foo": "hi! " + state["foo"]}
builder = StateGraph(ParentState)
builder.add_node("node_1", node_1)
builder.add_node("node_2", subgraph)
builder.add_edge(START, "node_1")
builder.add_edge("node_1", "node_2")
graph = builder.compile()
for chunk in graph.stream(
{"foo": "foo"},
stream_mode="updates",
subgraphs=True, # [!code highlight]
version="v2", # [!code highlight]
):
if chunk["type"] == "updates":
print(chunk["ns"], chunk["data"])
```
```
() {'node_1': {'foo': 'hi! foo'}}
('node_2:e58e5673-a661-ebb0-70d4-e298a7fc28b7',) {'subgraph_node_1': {'bar': 'bar'}}
('node_2:e58e5673-a661-ebb0-70d4-e298a7fc28b7',) {'subgraph_node_2': {'foo': 'hi! foobar'}}
() {'node_2': {'foo': 'hi! foobar'}}
```
***
如果你的子图与父图共享状态键,可以按照以下步骤将其添加到图中:
1. 定义子图工作流(下面示例中的 `subgraph_builder`)并编译它
2. 在定义父图工作流时,将编译后的子图传递给 [`add_node`](https://reference.langchain.com/python/langgraph/graph/state/StateGraph/add_node) 方法
```python theme={"theme":{"light":"catppuccin-latte","dark":"catppuccin-mocha"}}
from typing_extensions import TypedDict
from langgraph.graph.state import StateGraph, START
class State(TypedDict):
foo: str
# 子图
def subgraph_node_1(state: State):
return {"foo": "hi! " + state["foo"]}
subgraph_builder = StateGraph(State)
subgraph_builder.add_node(subgraph_node_1)
subgraph_builder.add_edge(START, "subgraph_node_1")
subgraph = subgraph_builder.compile()
# 父图
builder = StateGraph(State)
builder.add_node("node_1", subgraph) # [!code highlight]
builder.add_edge(START, "node_1")
graph = builder.compile()
```
```python theme={"theme":{"light":"catppuccin-latte","dark":"catppuccin-mocha"}}
from typing_extensions import TypedDict
from langgraph.graph.state import StateGraph, START
# 定义子图
class SubgraphState(TypedDict):
foo: str # 与父图状态共享
bar: str # SubgraphState 私有
def subgraph_node_1(state: SubgraphState):
return {"bar": "bar"}
def subgraph_node_2(state: SubgraphState):
# 注意此节点使用的状态键('bar')仅在子图中可用
# 并在共享状态键('foo')上发送更新
return {"foo": state["foo"] + state["bar"]}
subgraph_builder = StateGraph(SubgraphState)
subgraph_builder.add_node(subgraph_node_1)
subgraph_builder.add_node(subgraph_node_2)
subgraph_builder.add_edge(START, "subgraph_node_1")
subgraph_builder.add_edge("subgraph_node_1", "subgraph_node_2")
subgraph = subgraph_builder.compile()
# 定义父图
class ParentState(TypedDict):
foo: str
def node_1(state: ParentState):
return {"foo": "hi! " + state["foo"]}
builder = StateGraph(ParentState)
builder.add_node("node_1", node_1)
builder.add_node("node_2", subgraph)
builder.add_edge(START, "node_1")
builder.add_edge("node_1", "node_2")
graph = builder.compile()
for chunk in graph.stream({"foo": "foo"}, version="v2"):
if chunk["type"] == "updates":
print(chunk["data"])
```
```
{'node_1': {'foo': 'hi! foo'}}
{'node_2': {'foo': 'hi! foobar'}}
```
## 子图持久化
使用子图时,你需要决定其内部数据在多次调用之间如何处理。考虑一个委托给专家子智能体的客服机器人:计费专家子智能体应该记住客户之前的问题,还是每次调用都重新开始?
`.compile()` 上的 `checkpointer` 参数控制子图持久化:
| 模式 | `checkpointer=` | 行为 |
| ------------------------------- | --------------- | ------------------------------------------------------------------------------------------------------------------- |
| [每次调用](#per-invocation-default) | `None`(默认) | 每次调用从头开始,并继承父图的检查点器以在单次调用内支持[中断](/oss/python/langgraph/interrupts)和[持久执行](/oss/python/langgraph/durable-execution)。 |
| [每线程](#per-thread) | `True` | 状态在同一线程上跨调用累积。每次调用从上次结束的地方继续。 |
| [无状态](#stateless) | `False` | 完全没有检查点——像普通函数调用一样运行。不支持中断或持久执行。 |
每次调用模式适用于大多数应用,包括子智能体处理独立请求的[多智能体](/oss/python/langchain/multi-agent)系统。当子智能体需要多轮对话记忆时使用每线程模式(例如,在多次交换中积累上下文的研究助手)。
父图必须使用检查点器编译,子图持久化功能(中断、状态检查、每线程记忆)才能工作。参见[持久化](/oss/python/langgraph/persistence)。
下面的示例使用 LangChain 的 [`create_agent`](https://reference.langchain.com/python/langchain/agents/factory/create_agent),这是构建智能体的常见方式。`create_agent` 在底层生成一个 [LangGraph 图](/oss/python/langgraph/graph-api),因此所有子图持久化概念都直接适用。如果你使用原始 LangGraph `StateGraph` 构建,相同的模式和配置选项同样适用——详见[图 API](/oss/python/langgraph/graph-api)。
### 有状态
有状态子图继承父图的检查点器,这使得[中断](/oss/python/langgraph/interrupts)、[持久执行](/oss/python/langgraph/durable-execution)和状态检查成为可能。两种有状态模式的区别在于状态保留的时间长度。
#### 每次调用(默认)
这是大多数应用的推荐模式,包括子智能体作为工具调用的[多智能体](/oss/python/langchain/multi-agent)系统。它支持中断、[持久执行](/oss/python/langgraph/durable-execution)和并行调用,同时保持每次调用的隔离。
当子图的每次调用是独立的,且子智能体不需要记住之前调用的任何内容时,使用每次调用持久化。这是最常见的模式,特别是对于子智能体处理一次性请求(如"查找此客户的订单"或"总结此文档")的[多智能体](/oss/python/langchain/multi-agent)系统。
省略 `checkpointer` 或将其设置为 `None`。每次调用从头开始,但在单次调用内子图继承父图的检查点器,并可以使用 `interrupt()` 暂停和恢复。
以下示例使用两个子智能体(水果专家、蔬菜专家)作为外部智能体的工具包装:
```python theme={"theme":{"light":"catppuccin-latte","dark":"catppuccin-mocha"}}
from langchain.agents import create_agent
from langchain.tools import tool
from langgraph.checkpoint.memory import MemorySaver
from langgraph.types import Command, interrupt
@tool
def fruit_info(fruit_name: str) -> str:
"""查询水果信息。"""
return f"Info about {fruit_name}"
@tool
def veggie_info(veggie_name: str) -> str:
"""查询蔬菜信息。"""
return f"Info about {veggie_name}"
# 子智能体 - 不设置 checkpointer(继承父图)
fruit_agent = create_agent(
model="gpt-5.4-mini",
tools=[fruit_info],
prompt="You are a fruit expert. Use the fruit_info tool. Respond in one sentence.",
)
veggie_agent = create_agent(
model="gpt-5.4-mini",
tools=[veggie_info],
prompt="You are a veggie expert. Use the veggie_info tool. Respond in one sentence.",
)
# 将子智能体包装为外部智能体的工具
@tool
def ask_fruit_expert(question: str) -> str:
"""咨询水果专家。用于所有水果问题。"""
response = fruit_agent.invoke(
{"messages": [{"role": "user", "content": question}]},
)
return response["messages"][-1].content
@tool
def ask_veggie_expert(question: str) -> str:
"""咨询蔬菜专家。用于所有蔬菜问题。"""
response = veggie_agent.invoke(
{"messages": [{"role": "user", "content": question}]},
)
return response["messages"][-1].content
# 带检查点器的外部智能体
agent = create_agent(
model="gpt-5.4-mini",
tools=[ask_fruit_expert, ask_veggie_expert],
prompt=(
"You have two experts: ask_fruit_expert and ask_veggie_expert. "
"ALWAYS delegate questions to the appropriate expert."
),
checkpointer=MemorySaver(),
)
```
每次调用都可以使用 `interrupt()` 暂停和恢复。在工具函数中添加 `interrupt()` 以在继续之前要求用户确认:
```python theme={"theme":{"light":"catppuccin-latte","dark":"catppuccin-mocha"}}
@tool
def fruit_info(fruit_name: str) -> str:
"""查询水果信息。"""
interrupt("continue?") # [!code highlight]
return f"Info about {fruit_name}"
```
```python theme={"theme":{"light":"catppuccin-latte","dark":"catppuccin-mocha"}}
config = {"configurable": {"thread_id": "1"}}
# 调用 - 子智能体的工具调用了 interrupt()
response = agent.invoke(
{"messages": [{"role": "user", "content": "Tell me about apples"}]},
config=config,
)
# response 包含 __interrupt__
# 恢复 - 批准中断
response = agent.invoke(Command(resume=True), config=config) # [!code highlight]
# 子智能体消息数量:4
```
每次调用都从全新的子智能体状态开始。子智能体不记得之前的调用:
```python theme={"theme":{"light":"catppuccin-latte","dark":"catppuccin-mocha"}}
config = {"configurable": {"thread_id": "1"}}
# 第一次调用
response = agent.invoke(
{"messages": [{"role": "user", "content": "Tell me about apples"}]},
config=config,
)
# 子智能体消息数量:4
# 第二次调用 - 子智能体重新开始,不记得苹果
response = agent.invoke(
{"messages": [{"role": "user", "content": "Now tell me about bananas"}]},
config=config,
)
# 子智能体消息数量:4(仍然是全新的!)
```
对同一子图的多次调用不会冲突,因为每次调用都有自己的检查点命名空间:
```python theme={"theme":{"light":"catppuccin-latte","dark":"catppuccin-mocha"}}
config = {"configurable": {"thread_id": "1"}}
# LLM 为苹果和香蕉分别调用 ask_fruit_expert
response = agent.invoke(
{"messages": [{"role": "user", "content": "Tell me about apples and bananas"}]},
config=config,
)
# 子智能体消息数量:4(苹果 - 全新)
# 子智能体消息数量:4(香蕉 - 全新)
```
#### 每线程
当子智能体需要记住之前的交互时使用每线程持久化。例如,在多次交换中积累上下文的研究助手,或跟踪已编辑文件的编程助手。子智能体的对话历史和数据在同一线程上跨调用累积。每次调用从上次结束的地方继续。
使用 `checkpointer=True` 编译以启用此行为。
每线程子图不支持并行工具调用。当 LLM 可以访问每线程子智能体作为工具时,它可能会尝试并行多次调用该工具(例如,同时询问水果专家关于苹果和香蕉的问题)。这会导致检查点冲突,因为两次调用都写入同一命名空间。
下面的示例使用 LangChain 的 `ToolCallLimitMiddleware` 来防止此问题。如果你使用纯 LangGraph `StateGraph` 构建,你需要自行防止并行工具调用——例如,通过配置模型禁用并行工具调用,或通过添加逻辑确保同一子图不会被并行调用多次。
以下示例使用带 `checkpointer=True` 编译的水果专家子智能体:
```python theme={"theme":{"light":"catppuccin-latte","dark":"catppuccin-mocha"}}
from langchain.agents import create_agent
from langchain.agents.middleware import ToolCallLimitMiddleware
from langchain.tools import tool
from langgraph.checkpoint.memory import MemorySaver
from langgraph.types import Command, interrupt
@tool
def fruit_info(fruit_name: str) -> str:
"""查询水果信息。"""
return f"Info about {fruit_name}"
# 带 checkpointer=True 的子智能体用于持久状态
fruit_agent = create_agent(
model="gpt-5.4-mini",
tools=[fruit_info],
prompt="You are a fruit expert. Use the fruit_info tool. Respond in one sentence.",
checkpointer=True, # [!code highlight]
)
# 将子智能体包装为外部智能体的工具
@tool
def ask_fruit_expert(question: str) -> str:
"""咨询水果专家。用于所有水果问题。"""
response = fruit_agent.invoke(
{"messages": [{"role": "user", "content": question}]},
)
return response["messages"][-1].content
# 带检查点器的外部智能体
# 使用 ToolCallLimitMiddleware 防止对每线程子智能体的并行调用,
# 否则会导致检查点冲突。
agent = create_agent(
model="gpt-5.4-mini",
tools=[ask_fruit_expert],
prompt="You have a fruit expert. ALWAYS delegate fruit questions to ask_fruit_expert.",
middleware=[ # [!code highlight]
ToolCallLimitMiddleware(tool_name="ask_fruit_expert", run_limit=1), # [!code highlight]
], # [!code highlight]
checkpointer=MemorySaver(),
)
```
每线程子智能体像每次调用模式一样支持 `interrupt()`。在工具函数中添加 `interrupt()` 以要求用户确认:
```python theme={"theme":{"light":"catppuccin-latte","dark":"catppuccin-mocha"}}
@tool
def fruit_info(fruit_name: str) -> str:
"""查询水果信息。"""
interrupt("continue?") # [!code highlight]
return f"Info about {fruit_name}"
```
```python theme={"theme":{"light":"catppuccin-latte","dark":"catppuccin-mocha"}}
config = {"configurable": {"thread_id": "1"}}
# 调用 - 子智能体的工具调用了 interrupt()
response = agent.invoke(
{"messages": [{"role": "user", "content": "Tell me about apples"}]},
config=config,
)
# response 包含 __interrupt__
# 恢复 - 批准中断
response = agent.invoke(Command(resume=True), config=config) # [!code highlight]
# 子智能体消息数量:4
```
状态在多次调用之间累积——子智能体记住过去的对话:
```python theme={"theme":{"light":"catppuccin-latte","dark":"catppuccin-mocha"}}
config = {"configurable": {"thread_id": "1"}}
# 第一次调用
response = agent.invoke(
{"messages": [{"role": "user", "content": "Tell me about apples"}]},
config=config,
)
# 子智能体消息数量:4
# 第二次调用 - 子智能体记住苹果的对话
response = agent.invoke(
{"messages": [{"role": "user", "content": "Now tell me about bananas"}]},
config=config,
)
# 子智能体消息数量:8(累积的!)
```
当你有多个**不同的**每线程子图(例如水果专家和蔬菜专家)时,每个子图需要自己的存储空间,这样它们的检查点不会互相覆盖。这称为**命名空间隔离**。
如果你[在节点内调用子图](#call-a-subgraph-inside-a-node),LangGraph 根据调用顺序(第一次调用、第二次调用等)分配命名空间。这意味着重新排列调用可能会混淆哪个子图加载哪个状态。为避免这种情况,将每个子智能体包装在自己的 `StateGraph` 中并使用唯一的节点名——这为每个子图提供了稳定、唯一的命名空间:
```python theme={"theme":{"light":"catppuccin-latte","dark":"catppuccin-mocha"}}
from langgraph.graph import MessagesState, StateGraph
def create_sub_agent(model, *, name, **kwargs):
"""用唯一的节点名包装智能体以实现命名空间隔离。"""
agent = create_agent(model=model, name=name, **kwargs)
return (
StateGraph(MessagesState)
.add_node(name, agent) # 唯一名称 -> 稳定命名空间 # [!code highlight]
.add_edge("__start__", name)
.compile()
)
fruit_agent = create_sub_agent(
"gpt-5.4-mini", name="fruit_agent",
tools=[fruit_info], prompt="...", checkpointer=True,
)
veggie_agent = create_sub_agent(
"gpt-5.4-mini", name="veggie_agent",
tools=[veggie_info], prompt="...", checkpointer=True,
)
config = {"configurable": {"thread_id": "1"}}
# 第一次调用 - LLM 同时调用水果和蔬菜专家
response = agent.invoke(
{"messages": [{"role": "user", "content": "Tell me about cherries and broccoli"}]},
config=config,
)
# 水果子智能体消息数量:4
# 蔬菜子智能体消息数量:4
# 第二次调用 - 两个智能体独立累积
response = agent.invoke(
{"messages": [{"role": "user", "content": "Now tell me about oranges and carrots"}]},
config=config,
)
# 水果子智能体消息数量:8(记住樱桃!)
# 蔬菜子智能体消息数量:8(记住西兰花!)
```
[作为节点添加的](#add-a-subgraph-as-a-node)子图已经自动获得基于名称的命名空间,因此不需要此包装。
### 无状态
当你想像普通函数调用一样运行子智能体而没有检查点开销时使用此模式。子图无法暂停/恢复,也不能从[持久执行](/oss/python/langgraph/persistence)中受益。使用 `checkpointer=False` 编译。
没有检查点,子图就没有持久执行。如果进程在运行中途崩溃,子图无法恢复,必须从头开始重新运行。
```python theme={"theme":{"light":"catppuccin-latte","dark":"catppuccin-mocha"}}
subgraph_builder = StateGraph(...)
subgraph = subgraph_builder.compile(checkpointer=False) # [!code highlight]
```
### 检查点器参考
通过 `.compile()` 上的 `checkpointer` 参数控制子图持久化:
```python theme={"theme":{"light":"catppuccin-latte","dark":"catppuccin-mocha"}}
subgraph = builder.compile(checkpointer=False) # 或 True / None
```
| 功能 | 每次调用(默认) | 每线程 | 无状态 |
| --------------- | ----------------------------------------------------------------------------------- | ----------------------------------------------------------------- | ------- |
| `checkpointer=` | `None` | `True` | `False` |
| 中断 (HITL) | ✅ | ✅ | ❌ |
| 多轮记忆 | ❌ | ✅ | ❌ |
| 多次调用(不同子图) | ✅ | ⚠️ | ✅ |
| 多次调用(相同子图) | ✅ | ❌ | ✅ |
| 状态检查 | ⚠️ | ✅ | ❌ |
* **中断 (HITL)**:子图可以使用 [interrupt()](/oss/python/langgraph/interrupts) 暂停执行并等待用户输入,然后从暂停处恢复。
* **多轮记忆**:子图在同一[线程](/oss/python/langgraph/persistence#threads)的多次调用之间保留状态。每次调用从上次结束的地方继续,而不是重新开始。
* **多次调用(不同子图)**:可以在单个节点内调用多个不同的子图实例而不会产生检查点命名空间冲突。
* **多次调用(相同子图)**:可以在单个节点内多次调用同一子图实例。使用有状态持久化时,这些调用写入同一检查点命名空间并产生冲突——请改用每次调用持久化。
* **状态检查**:子图的状态可通过 `get_state(config, subgraphs=True)` 获取,用于调试和监控。
## 查看子图状态
启用[持久化](/oss/python/langgraph/persistence)后,你可以使用 subgraphs 选项检查子图状态。使用[无状态](#stateless)检查点(`checkpointer=False`)时,不会保存子图检查点,因此子图状态不可用。
查看子图状态需要 LangGraph 能够**静态发现**子图——即它是[作为节点添加的](#add-a-subgraph-as-a-node)或[在节点内调用的](#call-a-subgraph-inside-a-node)。当子图在[工具](/oss/python/langchain/tools)函数或其他间接方式中调用时(例如[子智能体](/oss/python/langchain/multi-agent/subagents)模式),此功能不起作用。无论嵌套层级如何,中断仍然会传播到顶层图。
仅返回**当前调用**的子图状态。每次调用都从头开始。
```python theme={"theme":{"light":"catppuccin-latte","dark":"catppuccin-mocha"}}
from langgraph.graph import START, StateGraph
from langgraph.checkpoint.memory import MemorySaver
from langgraph.types import interrupt, Command
from typing_extensions import TypedDict
class State(TypedDict):
foo: str
# 子图
def subgraph_node_1(state: State):
value = interrupt("Provide value:")
return {"foo": state["foo"] + value}
subgraph_builder = StateGraph(State)
subgraph_builder.add_node(subgraph_node_1)
subgraph_builder.add_edge(START, "subgraph_node_1")
subgraph = subgraph_builder.compile() # 继承父图检查点器
# 父图
builder = StateGraph(State)
builder.add_node("node_1", subgraph)
builder.add_edge(START, "node_1")
checkpointer = MemorySaver()
graph = builder.compile(checkpointer=checkpointer)
config = {"configurable": {"thread_id": "1"}}
graph.invoke({"foo": ""}, config)
# 查看当前调用的子图状态
subgraph_state = graph.get_state(config, subgraphs=True).tasks[0].state # [!code highlight]
# 恢复子图
graph.invoke(Command(resume="bar"), config)
```
返回此线程上所有调用**累积的**子图状态。
```python theme={"theme":{"light":"catppuccin-latte","dark":"catppuccin-mocha"}}
from langgraph.graph import START, StateGraph, MessagesState
from langgraph.checkpoint.memory import MemorySaver
# 带有自己持久状态的子图
subgraph_builder = StateGraph(MessagesState)
# ... 添加节点和边
subgraph = subgraph_builder.compile(checkpointer=True) # [!code highlight]
# 父图
builder = StateGraph(MessagesState)
builder.add_node("agent", subgraph)
builder.add_edge(START, "agent")
checkpointer = MemorySaver()
graph = builder.compile(checkpointer=checkpointer)
config = {"configurable": {"thread_id": "1"}}
graph.invoke({"messages": [{"role": "user", "content": "hi"}]}, config)
graph.invoke({"messages": [{"role": "user", "content": "what did I say?"}]}, config)
# 查看累积的子图状态(包含两次调用的消息)
subgraph_state = graph.get_state(config, subgraphs=True).tasks[0].state # [!code highlight]
```
## 流式输出子图
要在流式输出中包含子图的输出,你可以在父图的 stream 方法中设置 subgraphs 选项。这将流式输出父图和任何子图的输出。
使用 `version="v2"` 时,子图事件使用相同的 `StreamPart` 格式。`ns` 字段标识来源图:
```python theme={"theme":{"light":"catppuccin-latte","dark":"catppuccin-mocha"}}
for chunk in graph.stream(
{"foo": "foo"},
subgraphs=True, # [!code highlight]
stream_mode="updates",
version="v2", # [!code highlight]
):
print(chunk["type"]) # "updates"
print(chunk["ns"]) # () 表示根图,("node_2:",) 表示子图
print(chunk["data"]) # {"node_name": {"key": "value"}}
```
```python theme={"theme":{"light":"catppuccin-latte","dark":"catppuccin-mocha"}}
for chunk in graph.stream(
{"foo": "foo"},
subgraphs=True, # [!code highlight]
stream_mode="updates",
):
print(chunk)
```
```python theme={"theme":{"light":"catppuccin-latte","dark":"catppuccin-mocha"}}
from typing_extensions import TypedDict
from langgraph.graph.state import StateGraph, START
# 定义子图
class SubgraphState(TypedDict):
foo: str
bar: str
def subgraph_node_1(state: SubgraphState):
return {"bar": "bar"}
def subgraph_node_2(state: SubgraphState):
# 注意此节点使用的状态键('bar')仅在子图中可用
# 并在共享状态键('foo')上发送更新
return {"foo": state["foo"] + state["bar"]}
subgraph_builder = StateGraph(SubgraphState)
subgraph_builder.add_node(subgraph_node_1)
subgraph_builder.add_node(subgraph_node_2)
subgraph_builder.add_edge(START, "subgraph_node_1")
subgraph_builder.add_edge("subgraph_node_1", "subgraph_node_2")
subgraph = subgraph_builder.compile()
# 定义父图
class ParentState(TypedDict):
foo: str
def node_1(state: ParentState):
return {"foo": "hi! " + state["foo"]}
builder = StateGraph(ParentState)
builder.add_node("node_1", node_1)
builder.add_node("node_2", subgraph)
builder.add_edge(START, "node_1")
builder.add_edge("node_1", "node_2")
graph = builder.compile()
for chunk in graph.stream(
{"foo": "foo"},
stream_mode="updates",
subgraphs=True, # [!code highlight]
version="v2", # [!code highlight]
):
if chunk["type"] == "updates":
print(chunk["ns"], chunk["data"])
```
```
() {'node_1': {'foo': 'hi! foo'}}
('node_2:e58e5673-a661-ebb0-70d4-e298a7fc28b7',) {'subgraph_node_1': {'bar': 'bar'}}
('node_2:e58e5673-a661-ebb0-70d4-e298a7fc28b7',) {'subgraph_node_2': {'foo': 'hi! foobar'}}
() {'node_2': {'foo': 'hi! foobar'}}
```
***
[将这些文档连接](/use-these-docs)到 Claude、VSCode 等,通过 MCP 获取实时答案。
[在 GitHub 上编辑此页面](https://github.com/langchain-ai/docs/edit/main/src/oss/langgraph/use-subgraphs.mdx)或[提交 issue](https://github.com/langchain-ai/docs/issues/new/choose)。